
The tru.ID SIMCheck API indicates whether a SIM card associated with a mobile phone number was changed within the last seven days. This provides an extra layer of security in your application login flows, and can be used to detect attempted SIM swap fraud. It can be used to augment existing 2FA or anti-fraud workflows.
You can find the completed code in the firebase-phone-auth-sim-swap-detection-ios GitHub repository.
Before you begin
You will need to:
- Download Xcode 12.4 or above
- Register for a developer account at Apple Developer Portal if you do not have one already
- Have an iPhone or an iPad with a SIM card
- Have node.js installed for the tru.ID CLI
Get Started
A tru.ID Account is needed to make the SIMCheck API requests, so make sure you've created one.You're also going to need some Project credentials from tru.ID to make API calls. So sign up for a tru.ID account, which comes with some free credit. We've built a CLI for you to manage your tru.ID account, projects, and credentials within your Terminal. To install the tru.ID CLI run the following command:npm install -g @tru_id/cli
tru login <YOUR_IDENTITY_PROVIDER> (this is one of google, github, or microsoft) using the Identity Provider you used when signing up. This command will open a new browser window and ask you to confirm your login. A successful login will show something similar to the below:Success. Tokens were written to /Users/user/.config/@tru_id/cli/config.json. You can now close the browser
config.json file contains some information you won't need to modify. This config file includes your Workspace Data Residency (EU, IN, US), your Workspace ID, and token information such as your scope.Create a new tru.ID project within the root directory with the following command:tru projects:create firebaseAuthSimIos --project-dir .
firebaseAuthSimIos directory and run the following command to clone the dev-server:git clone git@github.com:tru-ID/dev-server.git
dev-server directory, run the following command to create a.env copy of .env.example:cp .env.example .env
.env file, update the values of TRU_ID_CLIENT_ID andTRU_ID_CLIENT_SECRET with your client_id and client_secret in yourtru.json file.dev-server to the Internet for your mobile application to access your backend server. For this tutorial, we're using ngrok, which we've included in the dev-server functionality. So to start with, uncomment the following and populate them with your ngrok credentials:NGROK_ENABLED=true#NGROK_SUBDOMAIN=a-subdomain # Uncommenting this is optional. It is only available if you have a paid ngrok account.NGROK_AUTHTOKEN=<YOUR_NGROK_AUTHTOKEN> # This is found in the ngrok dashboard: https://dashboard.ngrok.com/get-started/your-authtokenNGROK_REGION=eu # This is where your ngrok URL will be hosted. If you're using tru.ID's `eu` data residency; leave it as is. Otherwise, you could specify `in` or `us`.
dev-server directory, run the following two commands:npm install # Installs all third-party dependencies in package.jsonnpm run dev # Starts the server
Now, we can continue with creating our new iOS project.
Create a new iOS project
With the tru.ID account created and the development server up and running, we can start developing an application. You can skip this step if you already have an iOS project. Otherwise:
- Launch your Xcode
- File -> New -> Project
- In the ‘Choose a template for your new project’ modal, select App and click Next
- Set ‘firebase-phone-auth-sim-swap-detection’ as the Product Name (however, you can use whatever the name of your project is)
- Select your Team, and make sure to assign an organization identifier using a reverse domain notation
- Keep it simple, and use a Storyboard, UIKit App Delegate and Swift as the development language
- Uncheck Use Code Data if it is checked, and click ‘Next’
- Select the folder you want to store your project in and click ‘Next’
As you see, it is a very simple project with a single ViewControlller and this is enough to demonstrate SIMCheck and Firebase phone authentication.
If you already have Xcode and have added your developer account (Xcode->Preferences->Accounts), Xcode takes care of generating necessary certificates and provisioning profiles in order to install the app on the device.
Add Firebase to your iOS project
Follow the instructions at the official Firebase documentation to Add Firebase to your iOS project. The official instructions are well detailed and easy to follow, but the steps from the official documentation are also provided below:
-
Check the Prerequisites
-
Step 1: Create a Firebase project
-
Step 2: Register your app with Firebase
-
Step 3: Add a Firebase configuration file (Drag and drop the downloaded GoogleService-Info.plist to your iOS Project. Make sure the config file name is not appended with additional characters, like (2).)
-
Step 4: Add Firebase SDKs to your app (Install Cocoapods as mentioned within the Prerequisites.)
Create a Podfile if you don't already have one:
cd your-project-directorypod initAdd the Firebase Auth pod to your application Podfile:
target 'firebase-phone-auth-sim-swap-detection' do# Comment the next line if you don't want to use dynamic frameworksuse_frameworks!# Pods for firebase-phone-auth-sim-swap-detectionpod 'Firebase/Auth'endInstall the pods:
pod installClose Xcode. Open your
.xcworkspacefile to see the project in Xcode. -
Step 5: Initialize Firebase in your app
The final step is to add initialization code to your application.
Import the Firebase module in your
UIApplicationDelegate:import FirebaseConfigure a FirebaseApp shared instance, typically in your app's
application:didFinishLaunchingWithOptions:method:// Use Firebase library to configure APIsFirebaseApp.configure()
After completing all 5 steps, you're set to build the User Interface within your iOS Project.
Build the User Interface
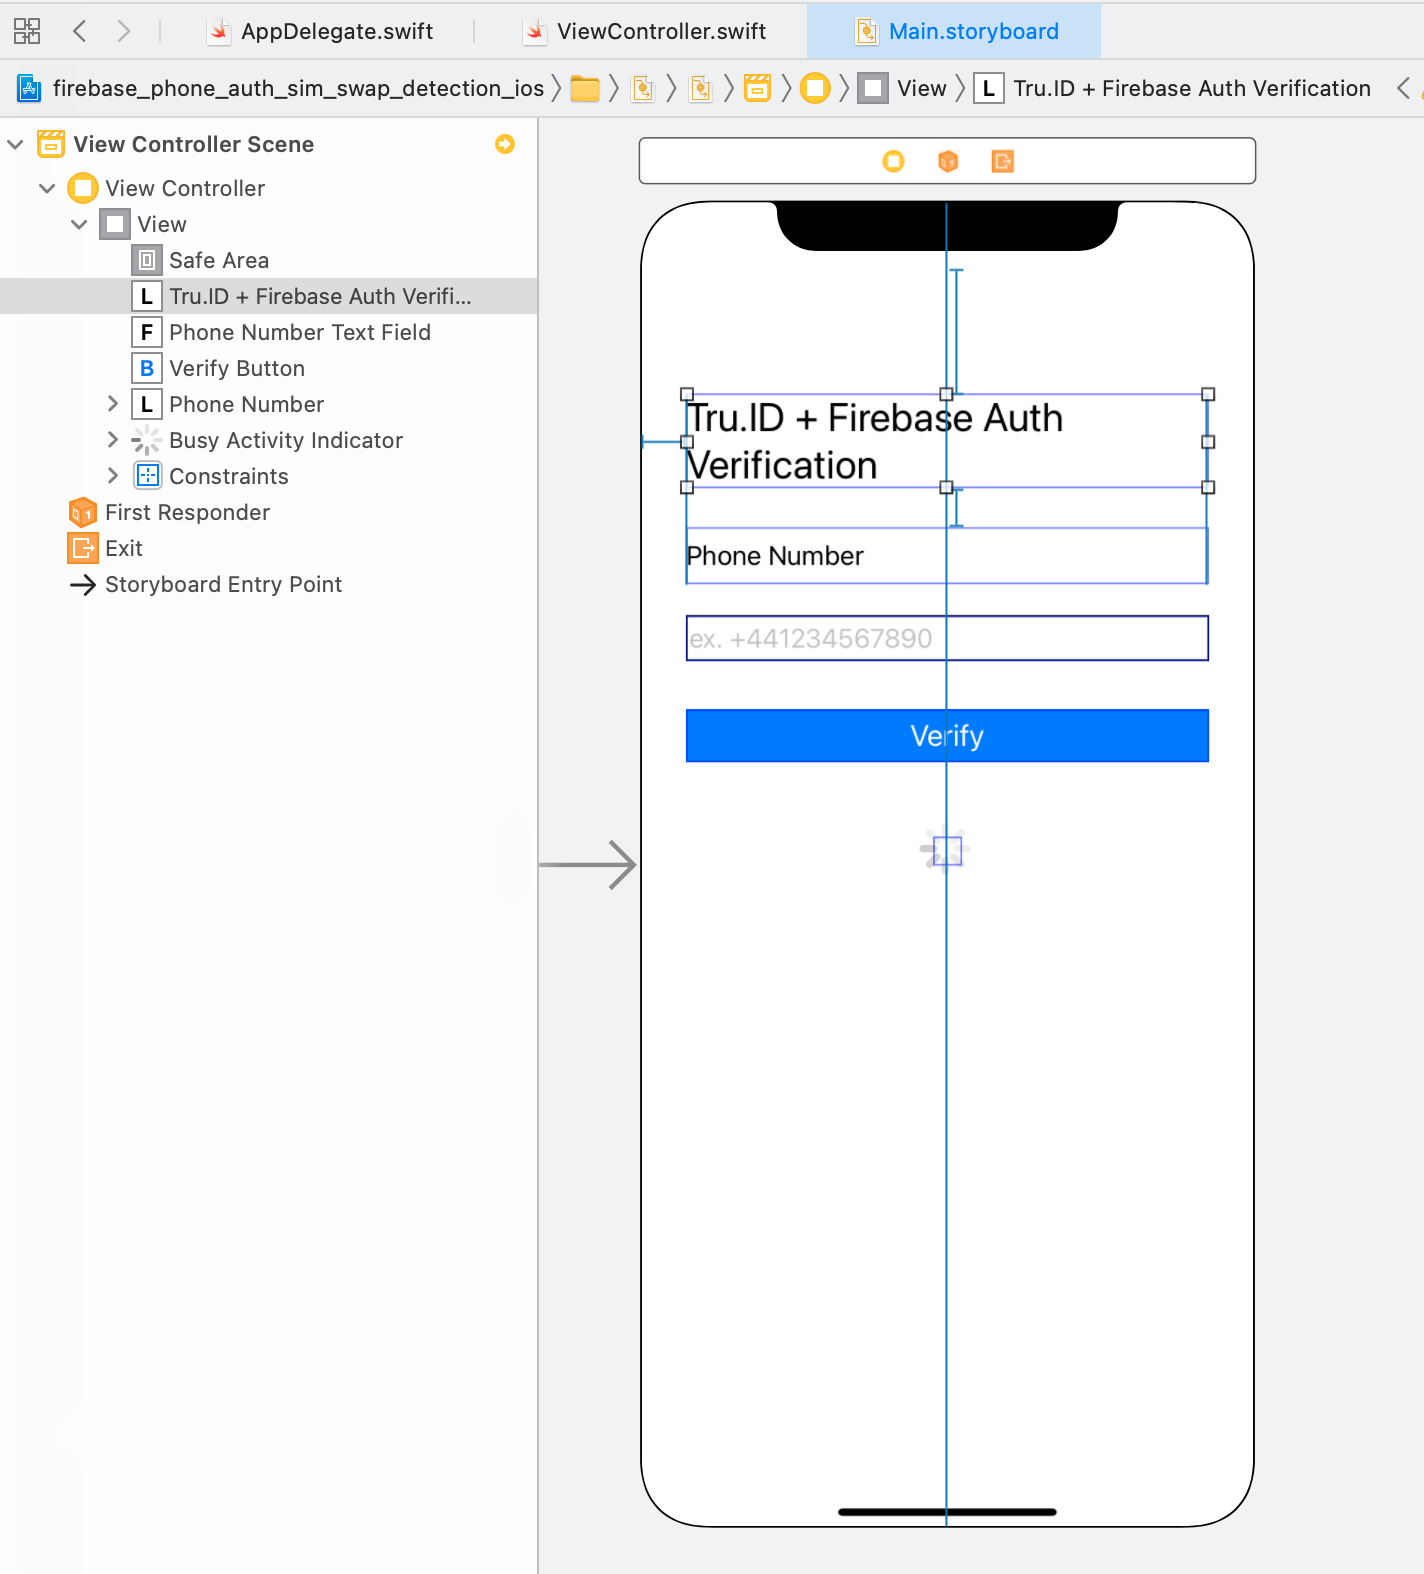
Navigate to the Main.storyboard. You need to add a few UI components to receive input from the user, and provide feedback:
- Add a
UILabelto the View Controller's view as a title with a text ‘Verification’ - A
UILabelwith a text ‘Phone number’ to indicate what the next text field is for - A
UITextFieldso that the user can enter their phone number - A
UIButtonwith the text ‘Verify’ to trigger the SIMCheck request - A
UIActivityIndicator(Large) as a work in progress feedback indicator to the user when you perform a SIMCheck
All UI components are ‘Horizontally’ aligned in the container using constraints. You should also define constraints to anchor the components as well. You can use Reset to Suggested Constraints within Resolve Auto Layout Issues.
The view layout should look like this:
Add a few configuration options for these UI components:
- Phone number
UITextField:Select the text field, and on the Attributes Inspector, scroll toText Input Traitsand change theContent TypetoTelephone Number. Also, change theKeyboard TypetoPhone Pad UIActivityIndicator: Select the activity indicator, and on the Attributes Inspector checkHides When Stopped
Next, let's define Outlets in the ViewController so that you can control the UI state. Select ViewController in Xcode, and then by using the ⌥, select the Main.storyboard file. Both ViewController.swift and Main.storyboard should be opened side by side.
Select the UITextField you inserted into the storyboard, and with the ⌃ key pressed, drag a connection from the storyboard to the ViewController.swift. Xcode indicates possible places in the Editor where you can create an Outlet.
When you are happy, release the keys and mouse/trackpad. You will be prompted to enter a name for the variable; type phoneNumberTextField. This allows you to retrieve the phone number entered by the user.
You need to connect UIButton and UIActivityIndicator as well. Let's perform the above steps for these as well respectively and name them as follows:
verifyButtonbusyActivityIndicator
You now have one last task to do related to the storyboard. Let's insert an action. When a user taps on the Verify button, you want the ViewController to know that the user wants to initiate the SIMCheck.
Select the Verify button, and with your ⌃ key pressed, drag a connection from the storyboard to the ViewController.swift. Xcode indicates possible places where you can create an IBAction. When you are happy, release the keys and mouse/trackpad. You will be prompted to enter a name for the method: type verify, and Xcode will insert the method with an IBAction annotation.
class ViewController: UIViewController {@IBOutlet weak var phoneNumberTextField: UITextField!@IBOutlet weak var verifyButton: UIButton!@IBOutlet weak var busyActivityIndicator: UIActivityIndicatorView!...
UI Methods
Let's create additional methods to manage the UI state and to display messages to the user. It will be more organised to keep these methods in an extension to the ViewController.swift as below:
extension ViewController {private func controls(enabled: Bool) {if enabled {busyActivityIndicator.stopAnimating()} else {busyActivityIndicator.startAnimating()}phoneNumberTextField.isEnabled = enabledverifyButton.isEnabled = enabled}private func displayAlert(title: String, message: String) {let alertController = self.prepareAlert(title: title, message: message)self.present(alertController, animated: true, completion: nil)self.controls(enabled: true)}private func prepareAlert(title: String, message: String) -> UIAlertController {let alertController = UIAlertController(title: title, message: message, preferredStyle: UIAlertController.Style.alert)alertController.addAction(UIAlertAction(title: "OK", style: UIAlertAction.Style.default, handler: { (action) inself.dismiss(animated: true, completion: nil)}))return alertController}}
The first method is controls(enabled: Bool) which shows or hides the busyActivityIndicator. It also disables the phoneNumberTextField and the verifyButton when the FirebasePhoneAuthentication/SIMCheck flow is in progress.
You will use this method later in the verify(_ sender: Any) method.
The next two methods, prepareAlert(title: String, message: String) and displayAlert(title: String, message: String), are for displaying messages to the user via the UIAlertController.
As you can see, the controls method is used within the displayAlert method to restore the UI controls back to their original state by setting the enabled variable to true so that the user can re-execute the workflow.
Add Firebase phone authentication
Now that you have your Firebase project set up and your User Interface built up, you can start with enabling phone number sign-in for your Firebase project.
Select ‘Authentication’ within your Firebase project. Select ‘Phone’, click the toggle to ‘enable’, and select ‘Save’.
You have already completed the Before you begin section and Step 1 Enable Phone Number sign-in for your Firebase project, so proceed to enabling app verification:
Enable app verification
There are two ways for Firebase Authentication to accomplish verifying that a phone number sign-in request is coming from your app:
Silent APNs notifications
To set up Silent APNs notifications, follow the Apple Developer guide to Enable the Remote Notifications Capability.
Please note that data-only cloud messaging only works on real devices where the app has background refresh enabled. If background refresh is disabled, or if using the Simulator, app verification uses the fallback reCAPTCHA flow, allowing you to check if it is configured correctly.
To enable APNs notifications for use with Firebase Authentication:
-
In Xcode, enable push notifications for your project.
-
Upload your APNs authentication key to Firebase. If you don't already have an APNs authentication key, see Configuring APNs with FCM.
- Inside your project in the Firebase console, select the gear icon, select Project Settings, and then select the Cloud Messaging tab.
- In APNs authentication key under iOS app configuration, click the Upload button.
- Browse to the location where you saved your key, select it, and click Open. Add the key ID for the key (available in Certificates, Identifiers & Profiles in the Apple Developer Member Center) and click Upload. If you already have an APNs certificate, you can upload the certificate instead.
reCAPTCHA verification
To enable the Firebase SDK to use reCAPTCHA verification, add custom URL schemes to your Xcode project:
- Open your project configuration: double-click the project name in the left tree view. Select your app from the TARGETS section, then select the Info tab, and expand the URL Types section.
- Click the + button and add a URL scheme for your reversed client ID. To find this value, open the
GoogleService-Info.plistconfiguration file, and look for theREVERSED_CLIENT_IDkey. Copy the value of that key, and paste it into the URL Schemes box on the configuration page. Leave the other fields blank.
Send a verification code
With all the configuration set up, we're in a position to write the code to send a verification code to the user's phone.
To do this, create a method for the Firebase Phone verification in ViewController.swift named executeFirebasePhoneVerification to be called when the verify button is touched.
import Firebase@IBAction func verify(_ sender: Any) {if var phoneNumber = phoneNumberTextField.text, !phoneNumber.isEmpty {phoneNumber = phoneNumber.replacingOccurrences(of: "\\s*", with: "", options: [.regularExpression])controls(enabled: false)self.executeFirebasePhoneVerification(phoneNumber: phoneNumber)}}func executeFirebasePhoneVerification(phoneNumber: String) {Auth.auth().languageCode = "en"PhoneAuthProvider.provider().verifyPhoneNumber(phoneNumber, uiDelegate: nil) { [weak self] (verificationID, error) inif let error = error {self?.displayAlert(title: "Error", message: error.localizedDescription)return}UserDefaults.standard.set(verificationID, forKey: "authVerificationID")}}
The verify method in the above code gets the user's phone number from the phoneNumberTextField, checks the value, and calls executeFirebasePhoneVerification.
The next step within verify is to use the previously created controls method by setting the enabled variable to false. This allows us to disable the phone number text field and the verify button, show the activity indicator, and start spinning it when the user taps the Verify button.
Within executeFirebasePhoneVerification the auth language is set to English and verifyPhoneNumber:UIDelegate:completion: is called, passing to it the phone number.
When you call verifyPhoneNumber:UIDelegate:completion:, Firebase sends a silent push notification to your app, or issues a reCAPTCHA challenge to the user. After your app receives the notification or the user completes the reCAPTCHA challenge, Firebase sends an SMS message containing an authentication code to the specified phone number and passes a verification ID to your completion function. You will need both the verification code and the verification ID to sign the user in.
The call to UserDefaults.standard.set saves the verification ID so it can be restored when your app loads. By doing so, you can ensure that you still have a valid verification ID if your app is terminated before the user completes the sign-in flow (for example, while switching to the SMS app).
If the call to verifyPhoneNumber:UIDelegate:completion: succeeds, you can prompt the user to type the verification code when they receive it via SMS message.
Sign the user in
Add the following method to the ViewController.swift to prompt the user to enter their OTP code that has been sent via SMS:
private func presentOTPTextEntry(completion: @escaping (String?) -> Void) {let OTPTextEntry = UIAlertController(title: "Sign in with Phone Auth",message: nil,preferredStyle: .alert)OTPTextEntry.addTextField { textfield intextfield.placeholder = "Enter OTP code."textfield.textContentType = .oneTimeCode}let onContinue: (UIAlertAction) -> Void = { _ inlet text = OTPTextEntry.textFields!.first!.text!completion(text)}let onCancel: (UIAlertAction) -> Void = {_ incompletion(nil)}OTPTextEntry.addAction(UIAlertAction(title: "Continue", style: .default, handler: onContinue))OTPTextEntry.addAction(UIAlertAction(title: "Cancel", style: .cancel, handler: onCancel))present(OTPTextEntry, animated: true, completion: nil)}
Here, we create an Alert dialog message with ‘Continue’ and ‘Cancel’ buttons with Action handlers, and a UITextField for the OTP. Upon completion, the value of the text field – the OTP – is returned.
Update the executeFirebasePhoneVerification method to call the presentOTPTextEntry function and sign the user in:
...UserDefaults.standard.set(verificationID, forKey: "authVerificationID")self?.presentOTPTextEntry { (otpCode) inlet verificationID = UserDefaults.standard.string(forKey: "authVerificationID")if let code = otpCode, !code.isEmpty, let verificationID = verificationID {let credential = PhoneAuthProvider.provider().credential(withVerificationID: verificationID, verificationCode: code)Auth.auth().signIn(with: credential) { result, error inif let error = error {self?.displayAlert(title: "Error", message: error.localizedDescription)} else {//"Sign In Success"self?.displayAlert(title: "Message", message: "Sign in Success")}}} else {self?.controls(enabled: true)}}
After the user provides your app with the verification code from the SMS message, retrieve the stored verificationID.
Then, with the verification code stored in the otpCode variable, sign the user in by creating a FIRPhoneAuthCredential object (assigned to the credentials variable) from the verification code and verification ID, and passing that object to signInWithCredential:completion:.
let credential = PhoneAuthProvider.provider().credential(withVerificationID: verificationID, verificationCode: otpCode)Auth.auth().signIn(with: credential) { result, error in...
The user receives an Alert Notification reading either ‘Sign in Success’ when the OTP entered is valid, or ‘There is something wrong with the OTP’.
You have now completed the code for authenticating with Firebase.
Adding SIM swap detection with SIMCheck
We're now ready to add SIM Swap detection to the application's workflow using SIMCheck before signing in to Firebase.
Create a method called truIDSIMCheckVerification:
enum AppError: String, Error {case BadRequestcase NoDatacase DecodingIssuecase Other}func truIDSIMCheckVerification(phoneNumber: String, completionHandler: @escaping (Bool, Error?) -> Void) {let session = URLSession.sharedlet url = URL(string: "https://{subdomain}.loca.lt/sim-check")!var urlRequest = URLRequest(url: url)urlRequest.httpMethod = "POST"urlRequest.addValue("application/json", forHTTPHeaderField: "Content-Type")let json = [ "phone_number": phoneNumber ]let jsonData = try! JSONSerialization.data(withJSONObject: json, options: [])urlRequest.httpBody = jsonDatalet task = session.dataTask(with: urlRequest) { data, response, error inif error != nil {completionHandler(false, error)return}let httpResponse = response as! HTTPURLResponseif httpResponse.statusCode == 200 {print(String(data: data!, encoding: .utf8)!)do {if let json = try JSONSerialization.jsonObject(with: data!, options: []) as? [String:Any]{let noSimChange = json["no_sim_change"] as! BoolcompletionHandler(noSimChange, nil)}} catch {completionHandler(false, AppError.DecodingIssue)print("JSON error: \(error.localizedDescription)")}} else if (400...500) ~= httpResponse.statusCode {completionHandler(false, AppError.BadRequest)print("There is an error \(httpResponse)")} else {completionHandler(false, AppError.Other)}}task.resume()}
There's a lot going on here so let's break it down.
Set up the request with URLSession
We first make an HTTP POST request to the /sim-check endpoint (i.e. localtunnel URL + /sim-check). The url will look like the following: https://{subdomain}.loca.lt/sim-check. In a production environment, you should use your own servers.
We create a session constant with the shared URLSession instance, and set up a URL instance that refers to the development server URL. Then, with that url, create an instance of URLRequest and assign it to the urlRequest variable. For the purposes of this tutorial, it is safe to force-unwrap. On the last line, assign POST to the httpMethod.
let session = URLSession.sharedlet url = URL(string: "https://{subdomain}.loca.lt/sim-check")!var urlRequest = URLRequest(url: url)urlRequest.httpMethod = "POST"
Set up the request headers and body
The header below indicates that the request type is JSON.
urlRequest.addValue("application/json", forHTTPHeaderField: "Content-Type")
The request needs a body. In our case it’ll be a JSON object. We first create a simple dictionary with some values.
let json = [ "phone_number": phoneNumber ]
We then turn that dictionary into a Data object that uses the JSON format and assigns it to the urlRequest's body.
let jsonData = try! JSONSerialization.data(withJSONObject: json, options: [])urlRequest.httpBody = jsonData
Make the request with URLSessionDataTask
Next, we create a data task with the dataTask(with:completionHandler:) function of URLSession.
let task = session.dataTask(with: urlRequest) { data, response, error in//...}
The dataTask(with:completionHandler:) has two parameters: urlRequest (created earlier), and a completion handler which will be executed when the urlRequest completes (i.e. when a response has returned from the web server).
Handle the SIMCheck API result
The closure also has three parameters:
- the response
Dataobject: to check out what data we receive from the webserver (jsonData) - a
URLResponseobject: gives more information about the request's response, such as its encoding, length, etc. - an
Errorobject: if an error occurred while making the request. If no error occurred it will be simplynil.
4 different error cases are defined in an AppError enum:
enum AppError: String, Error {case BadRequestcase NoDatacase DecodingIssuecase Other}
If the HTTP response status code is 200 we check the response payload and check whether json has information about SIM card changes. If there is a problem deserializing the response call the completionHandler with false and the AppError.DecodingIssue.
let httpResponse = response as! HTTPURLResponseif httpResponse.statusCode == 200 {print(String(data: data!, encoding: .utf8)!)do {if let json = try JSONSerialization.jsonObject(with: data!, options: []) as? [String:Any]{let noSimChange = json["no_sim_change"] as! BoolcompletionHandler(noSimChange, nil)}} catch {completionHandler(false, AppError.DecodingIssue)print("JSON error: \(error.localizedDescription)")}}
A failed SIMCheck results in false being returned. A passed SIMCheck results in true being returned.
...} else if (400...500) ~= httpResponse.statusCode {completionHandler(false, AppError.BadRequest)print("There is an error \(httpResponse)")} else {completionHandler(false, AppError.Other)}}task.resume()}
If the HTTP response is 400...500, it will refer to an invalid phone number and defined as a BadRequest error case. All other errors are grouped under Other.
The network request is executed by calling task.resume(), and the completion handler is invoked when the network request completes or fails.
Integrate truIDSIMCheckVerification
Finally, integrate the new truIDSIMCheckVerification method so it's executed before the executeFirebasePhoneVerification method within the verify method.
@IBAction func verify(_ sender: Any) {if var phoneNumber = phoneNumberTextField.text, !phoneNumber.isEmpty {phoneNumber = phoneNumber.replacingOccurrences(of: "\\s*", with: "", options: [.regularExpression])controls(enabled: false)truIDSIMCheckVerification(phoneNumber: phoneNumber) { [weak self] result, error inDispatchQueue.main.async {if let err = error as? AppError {self?.displayAlert(title: "Error", message: "App Error: \(err.rawValue)")return}if result == true {self?.executeFirebasePhoneVerification(phoneNumber: phoneNumber)} else {self?.displayAlert(title: "SIM Change Detected", message: "SIM changed too recently. Please contact support.")}}}}}
UI updates need to be done on the main queue so are wrapped in DispatchQueue.main.async{ ... }, which ensures that all updates to the UI will be safely executed without causing any issues.
If there is an error, an Error alert is displayed to the user. If the user's SIM has changed recently, we display an Alert to the user. If the SIM hasn't changed, we perform the Firebase phone authentication.
That's it! You’ve successfully added SIM swap detection using tru.ID SIMCheck with Firebase Phone Auth so your users can securely sign-in to your iOS application.
Where next?
- The completed sample app can be found in the tru.ID firebase-phone-auth-sim-swap-detection-ios) GitHub repository.
- SIMCheck API reference
- SIM Card Based Mobile Authentication with iOS tutorial
Troubleshooting
If you have any questions please raise an issue on the GitHub repo.
Could not build Objective-C module 'Firebase'
Close Xcode. Open the ..xcworkspace file in Xcode.
Also see this Stack Overflow question.

