
tru.ID SubscriberCheck offers both mobile phone number verification and SIM swap detection. SubscriberCheck achieves this by combining the workflows of PhoneCheck, which confirms the ownership of a mobile phone number by verifying the possession of an active SIM card with the same number, with SIMCheck, which provides information on when a SIM card associated with a mobile phone number was last changed. SubscriberCheck can be used when augmenting existing 2FA or anti-fraud workflows.
If you'd prefer to go directly to the completed code, it's in the sim-card-auth-ios Github repository.
Before you begin
For development, you'll need:
- Xcode 12
- An Apple developer account via the Apple Developer Portal
- An iPhone or an iPad with a SIM card with an active data connection
- Node.js installed for the tru.ID CLI
With the above in place, let's dive into adding SubscriberCheck functionality to your iOS applications.
Getting Started
A tru.ID Account is needed to make the SubscriberCheck API requests, so make sure you've created one.You're also going to need some Project credentials from tru.ID to make API calls. So sign up for a tru.ID account, which comes with some free credit. We've built a CLI for you to manage your tru.ID account, projects, and credentials within your Terminal. To install the tru.ID CLI run the following command:npm install -g @tru_id/cli
tru login <YOUR_IDENTITY_PROVIDER> (this is one of google, github, or microsoft) using the Identity Provider you used when signing up. This command will open a new browser window and ask you to confirm your login. A successful login will show something similar to the below:Success. Tokens were written to /Users/user/.config/@tru_id/cli/config.json. You can now close the browser
config.json file contains some information you won't need to modify. This config file includes your Workspace Data Residency (EU, IN, US), your Workspace ID, and token information such as your scope.Create a new tru.ID project within the root directory with the following command:tru projects:create iosauthdemoserver --project-dir .
iosauthdemoserver directory and run the following command to clone the dev-server:git clone git@github.com:tru-ID/dev-server.git
dev-server directory, run the following command to create a.env copy of .env.example:cp .env.example .env
.env file, update the values of TRU_ID_CLIENT_ID andTRU_ID_CLIENT_SECRET with your client_id and client_secret in yourtru.json file.dev-server to the Internet for your mobile application to access your backend server. For this tutorial, we're using ngrok, which we've included in the dev-server functionality. So to start with, uncomment the following and populate them with your ngrok credentials:NGROK_ENABLED=true#NGROK_SUBDOMAIN=a-subdomain # Uncommenting this is optional. It is only available if you have a paid ngrok account.NGROK_AUTHTOKEN=<YOUR_NGROK_AUTHTOKEN> # This is found in the ngrok dashboard: https://dashboard.ngrok.com/get-started/your-authtokenNGROK_REGION=eu # This is where your ngrok URL will be hosted. If you're using tru.ID's `eu` data residency; leave it as is. Otherwise, you could specify `in` or `us`.
dev-server directory, run the following two commands:npm install # Installs all third-party dependencies in package.jsonnpm run dev # Starts the server
Create a New iOS Project
With the tru.ID account created and the development server up and running, we can make a start with the application. You can skip this step if you already have an iOS project. Otherwise;
- Launch your Xcode
- File -> New -> Project
- In the "Choose a template for your new project" modal, select App and click Next
- Set "sim-card-auth-ios" as the Product Name; however, you can use whatever the name of your project is
- Select your Team, and make sure to assign an organization identifier using a reverse domain notation
- Keep it simple, and use a Storyboard, UIKit App Delegate, and Swift as the development language
- Uncheck Use Code Data if it gets checked, and click Next
- Select the folder you want to store your project in and click Next
As you see, it is a pretty simple project with a single ViewController. At this point, you do not need to worry about the AppDelegate or SceneDelegate. This functionality is enough to demonstrate SubscriberCheck.
Suppose you already have Xcode and have added your developer account (Xcode->Preferences->Accounts). In that case, Xcode takes care of generating necessary certificates and provisioning profiles to install the app on the device.
Build the User Interface
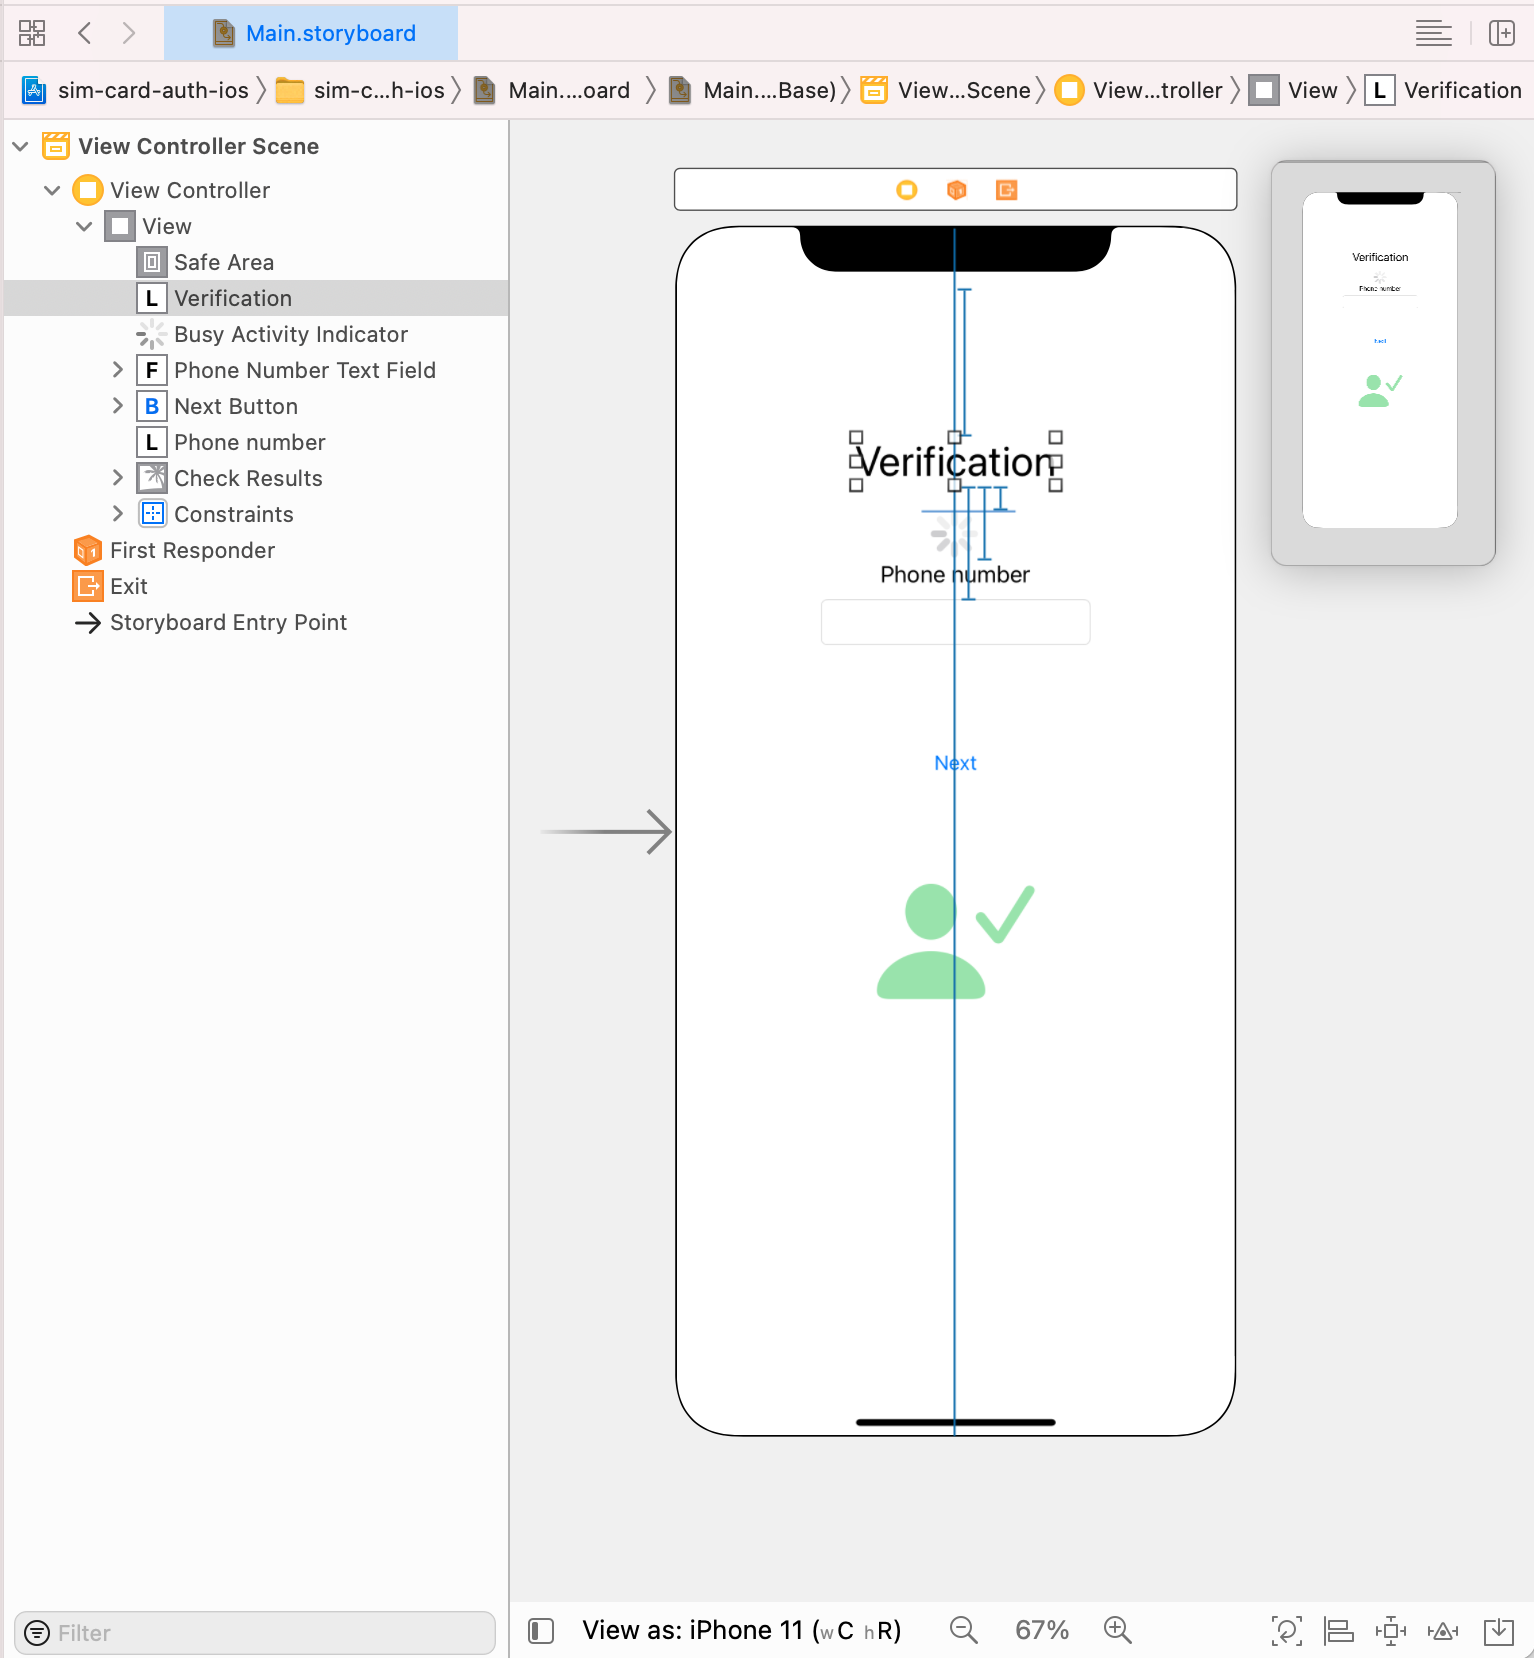
Navigate to the Main.storyboard. You need to add a few UI components to receive input from the user and provide feedback:
- Add a
UILabelto the View Controller's view as a title with the text "Verification". - A
UIActivityIndicator(Large) to show/hide progress when you perform a SubscriberCheck. - A
UILabelwith a text "Phone number" to indicate what the next text field is for. - A
UITextFieldso the user can enter their phone number. - A
UIButtonto trigger the SubscriberCheck request. - A
UImageViewto show whether SubscriberCheck is successful or not.
All UI components are "Horizontally" aligned in the container using constraints. You should also need to define constraints to anchor the components as well.
Start with the top "Verification" UILabel and specify the alignment between the Safe Area and the label. Do the same for all other components, define a constraint for the Top space, and add additional constraints for width and height where necessary.
The view layout should look like this:
There are a few configuration options you should add for these UI components.
- Phone number
UITextField: Select the text field, and on the Attributes Inspector, scroll toText Input Traitsand change theContent TypetoTelephone Number. Also, change theKeyboard TypetoPhone Pad. UIActivityIndicator: Select the activity indicator, and on the Attributes Inspector checkHides When Stopped.UIImageView: Select theUIImageView, and on the Attributes Inspector, scroll to Drawing, and checkHidden.
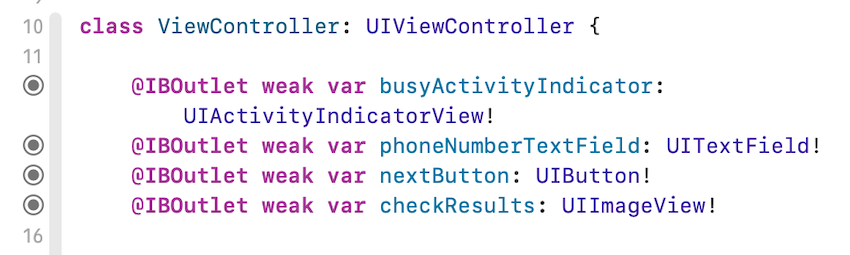
You need to define Outlets in the ViewController to control the UI state. Let's select ViewController in Xcode and then, using the ⌥ select Main.storyboard file. Both ViewController.swift and Main.storyboard should be opened side by side.
Select the UIActivityIndicator you inserted into the storyboard, and with the ⌃ key pressed, drag a connection from the storyboard to the ViewController.swift. Xcode indicates possible places in the Editor where you can create an Outlet.
When you are happy, release the keys and mouse/trackpad. You will be prompted to enter a name for the variable; type busyActivityIndicator.
You need to connect the UITextField, UIButton, and the UIImageView. Let's perform the above steps for these as well, respectively, and name them as follows:
- phoneNumberTextField
- nextButton
- checkResults
This allows you to retrieve the phone number entered by the user and control the state to provide feedback. You now have one last task to do related to the storyboard.
Let's insert an action. When a user taps the Next button, you want the ViewController to know that the user wants to initiate the SubscriberCheck. So select the Next button, and with your ⌃ key pressed, drag a connection from the storyboard to the ViewController.swift. Xcode indicates possible places where you can create an IBAction. When you are happy, release the keys and mouse/trackpad. You will be prompted to enter a name for the method: type next, and Xcode will insert the method with an IBAction annotation.
It is time to write some code to manage the UI state. The first method you will add is controls(enabled: Bool). This method helps us show or hide the checkResults and busyActivityIndicator. You should also disable the phoneNumberTextField when the SubscriberCheck flow is in progress.
// MARK: UI Controls Configure || Enable/Disableprivate func controls(enabled: Bool) {if enabled {busyActivityIndicator.stopAnimating()} else {busyActivityIndicator.startAnimating()}phoneNumberTextField.isEnabled = enablednextButton.isEnabled = enabledcheckResults.isHidden = !enabled}private func configureCheckResults(match: Bool, noSimChange: Bool) {if match {let image = UIImage(systemName: "person.fill.checkmark")self.checkResults.image = image?.withRenderingMode(.alwaysTemplate)self.checkResults.tintColor = .green} else {let image = UIImage(systemName: "person.fill.xmark")self.checkResults.image = image?.withRenderingMode(.alwaysTemplate)self.checkResults.tintColor = .red}}
You will use these methods later in the next(_ sender: Any) triggered by the user tapping the Next button.
Models, Structs & Protocols
Now is the time to create a new group called service in Project Navigator. You'll implement Model layer classes, structs, protocols, and enums here. Note that none of the files in this group should be importing UIKit.
Create a Swift file in the service group called SessionEndpoint.swift. In this file, we define a protocol called Endpoint and NetworkError of type Enum and a class that implements the protocol. Let's define the protocol Endpoint and NetworkError enum as in the following in this file.
import Foundationprotocol Endpoint {var baseURL: String { get }func makeRequest<U: Decodable>(urlRequest: URLRequest,handler: @escaping (Result<U, NetworkError>) -> Void)func createURLRequest(method: String,url: URL,payload:[String : String]?) -> URLRequest}enum NetworkError: Error {case invalidURLcase connectionFailed(String)case httpNotOKcase noData}
The purpose of the Endpoint protocol is to hide implementation details from the client of this protocol. It has two methods and a variable baseURL. It represents one REST API endpoint. We'll come back to this in more detail later.
Next, define our model object, which holds SubscriberCheck results.
Create a Swift file called SubscriberCheck.swift in the service, and implement a struct with the same name as below:
import Foundation// Response model based on https://developer.tru.id/docs/reference/products#operation/create-subscriber-check-v0.2struct SubscriberCheck: Codable {let check_id: String?let check_url: String?let status: SubscriberCheckStatus?let match: Bool?let no_sim_change: Bool?}enum SubscriberCheckStatus: String, Codable {case ACCEPTEDcase PENDINGcase COMPLETEDcase EXPIREDcase ERROR}
tru-ID REST API documentation provides us the basis for this struct. In production, your architecture and servers may expose a different REST response model. Also important to note that SubscriberCheck implements the Codable protocol as this will help JSONSerialization.data(..) to decode the JSON response to the SubscriberCheck easily.
Next, define a protocol that will help the View layer to talk to the Model layer implementation.
The View layer of our application is concerned with what the user will request. You shouldn't be concerned about "how" it will be done at this layer. Since it is all about SubscriberCheck, a simple Subscriber protocol defines a function to receive a phone number and provides a closure for the SubscriberCheck results should be sufficient.
Create a Swift file in the service group called SubscriberCheckService.swift. In this file, define the Subscriber protocol as the following:
protocol Subscriber {func check(phoneNumber: String,handler: @escaping (Result<SubscriberCheck, NetworkError>) -> Void)}
Create a class called SubscriberCheckService in the existing SubscriberCheckService.swift file, which implements the Subscriber protocol.
final class SubscriberCheckService: Subscriber {let path = "/subscriber-check"init(){}public func check(phoneNumber: String, handler: @escaping (Result<SubscriberCheck, NetworkError>) -> Void) {//Implement the workflow}}
A variable called path is defined to hold the path for the development server endpoint to perform the necessary calls. The path is /subscriber-check for the local development server. The check(phoneNumber: ...) method will contain the logic for the workflow.
Implement the User Action
At this point, the UI is almost ready to execute the SubscriberCheck workflow. Let's first define a variable of Subscriber type in our ViewController and then implement the next(_ sender: Any) IBAction we previously created.
Add the following code to the ViewController.
var subscriberService: Subscriber!override func viewDidLoad() {super.viewDidLoad()subscriberService = SubscriberCheckService()}
This code initializes subscriberService with a concrete implementation SubscriberCheckService which you defined in the previous section. SubscriberCheckService knows how to execute the workflow, and all ViewController needs to do is to call check(phoneNumber: String, ..) method and control the UI state. It is time to implement the next(_ sender: Any). It looks as follows:
@IBAction func next(_ sender: Any) {guard let phoneNumber = phoneNumberTextField.text else {return}if !phoneNumber.isEmpty {// Ideally, you should validate the phone number against e164 spec// Without leading + or 0's// For example: {country_code}{number}, 447940448591// Remove double 00'svar strippedPhoneNumber = phoneNumber.trimmingCharacters(in: .whitespacesAndNewlines)if let range = strippedPhoneNumber.range(of: "00") {strippedPhoneNumber.replaceSubrange(range, with: "")}controls(enabled: false)subscriberService.check(phoneNumber: strippedPhoneNumber) { [weak self] (checkResult) inDispatchQueue.main.async {switch checkResult {case .success(let subscriberCheck):self?.configureCheckResults(match: subscriberCheck.match ?? false, noSimChange: subscriberCheck.no_sim_change ?? false)case .failure(let error):print("\(error)")}self?.controls(enabled:true)}}}}
The implementation of the next method first checks whether there is text in the phoneNumberTextField and whether it is empty or not.
Note that in a production code, you should validate the phone number against the E.164 specification. We are keeping it simple for this tutorial by only removing 00 from the beginning of the phone number (if it exists) and trimming it.
The second step is to disable parts of the user interface, show the activity indicator and let it spin when the user taps the Next button. The third step is to call the check(phoneNumber:) method of the subscriberService. The handler will provide a checkResult of type Result<SubscriberCheck,NetworkError>. Note that this closure will not be called in the main queue. Therefore you need to wrap any code which accesses UIKit in a DispatchQueue.main.async.
You can access the model details and reconfigure the UI if the workflow executes successfully. Note that the .success case doesn't necessarily mean validation is successful; it simply indicates that workflow is committed without encountering any network errors.
To understand if you validated the phone number, you need to inspect the .success payload, which is of type SubscriberCheck. The following line will ensure that validation results are reflected in the UI:
self?.configureCheckResults(match: subscriberCheck.match ?? false, noSimChange: subscriberCheck.no_sim_change ?? false)
In any case, you restore the UI controls to their original state with the following code so that the user can re-execute the workflow if needed:
self?.controls(enabled:true)
Setup the Network and Define Endpoints
Your app may have ways of defining and accessing external service URLs, and these endpoints may be stored in configuration files such as a plist in your Swift code. In this tutorial, you store the development and production base URLs in a plist called TruIdService-Info.plist. These server endpoints proxy some of the requests through to the tru.ID API.
Create a group called util in the Project Navigator. Next, create the Property List:
- File -> New -> File
- Select Property List in the dialog
- Click Next
- Select where you want to store the file (default selected folder should be fine)
- Type
TruIdService-Infoas the file name - Click Create
You should see this file created in the util group. Now, let's add two keys to this plist file; one for the development endpoints and one for the production endpoints. The values should be String type.
development_server_base_urlproduction_server_base_url

You must assign the correct value to the development_server_base_url to complete this tutorial and successfully run the app on your device. This value is the one you are provided from the Terminal when you set up and ran your development server at the beginning of this tutorial (e.g. https://{subdomain}.{region}.ngrok.io). You should implement your backend for production setup and add this URL here in the production_server_base_url.
To read the plist, create a struct called AppConfiguration, which deals with loading the correct endpoint, so you do not have to worry when implementing the use cases.

import Foundationstruct AppConfiguration {let defaultConfigurationName = "TruIdService-Info"var configuration: [String : Any]?mutating func loadServerConfiguration() {if let path = Bundle.main.path(forResource: defaultConfigurationName, ofType: "plist"),let xml = FileManager.default.contents(atPath: path){self.configuration = (try? PropertyListSerialization.propertyList(from: xml,options: .mutableContainersAndLeaves,format: nil)) as? [String : Any]}}func baseURL() -> String? {var key = "production_server_base_url"#if DEBUGkey = "development_server_base_url"#endifreturn configuration?[key] as? String}}
The AppConfiguration struct simply reaches into the main bundle and searches for a plist called TruIdService-Info. If found, it reads the plist as a dictionary and binds that to the configuration variable. This URL is provided to the clients of the struct via the baseURL() -> String? method.
Now, implement a class called SessionEndpoint within the existing service/SessionEndpoint.swift file. This class is our implementation of simple network requests using URLSession. You can implement this protocol using URLSession, or with Alamofire. For this tutorial, let's keep it simple and implement the protocol using URLSession.
final class SessionEndpoint: Endpoint {let baseURL: Stringprivate let session: URLSessioninit() {var configuration = AppConfiguration()configuration.loadServerConfiguration()baseURL = configuration.baseURL()!//Fail early so that you know there is something wrongsession = SessionEndpoint.createSession()}private static func createSession() -> URLSession {let configuration = URLSessionConfiguration.ephemeral //you do not want OS to cache or persistconfiguration.allowsCellularAccess = trueconfiguration.waitsForConnectivity = trueconfiguration.networkServiceType = .responsiveDatareturn URLSession(configuration: configuration)}// MARK: Protocol Implementationfunc makeRequest<U: Decodable>(urlRequest: URLRequest,handler: @escaping (Result<U, NetworkError>) -> Void) {let task = session.dataTask(with: urlRequest) { (data, response, error) inif let error = error {handler(.failure(.connectionFailed(error.localizedDescription)))return}guard let httpResponse = response as? HTTPURLResponse,(200...299).contains(httpResponse.statusCode) else {handler(.failure(.connectionFailed("HTTP not OK")))return}guard let data = data else {handler(.failure(.noData))return}print("Response: \(String(describing: String(data: data, encoding: .utf8)))")if let dataModel = try? JSONDecoder().decode(U.self, from: data) {handler(.success(dataModel))return}}task.resume()}func createURLRequest(method: String, url: URL, payload:[String : String]?) -> URLRequest {var urlRequest = URLRequest(url: url)urlRequest.setValue("application/json; charset=utf-8", forHTTPHeaderField: "Content-Type")urlRequest.httpMethod = methodif let payload = payload {let jsonData = try! JSONSerialization.data(withJSONObject: payload, options: .prettyPrinted)urlRequest.httpBody = jsonData}return urlRequest}}
The init() method of the class loads a base URL from the AppConfiguration you defined earlier. Depending on the build scheme, it returns a URL for either a development server or a production server. The init() final line creates a URLSession using a private static method. Note that the createSession() method creates a session configuration that doesn't cache or persist network-related information; it is ephemeral for additional security.
The rest of the file contains the Endpoint protocol implementation. The first method, makeRequest<>.., creates a data task using the URLRequest provided and initiates the call. The method calls the handler closure for success or failure cases when the response is received. If data exists and there are no error scenarios, it attempts to decode the data to the model type provided.
The Result<> generic type refers to a model object, and an Enum provides error cases.
The createURLRequest(..) method receives three parameters; HTTP method name, the URL, and an optional payload if the request is a POST request, for instance. The method returns a URLRequest object, which is then used by the makeRequest<>.. method during the execution of the workflow.
Implement the Workflow
Now that you have defined the user interface and network request/response mechanics let's bridge the two and implement the business logic. It is time to talk about the SubscriberCheck workflow before you dive more into the coding.
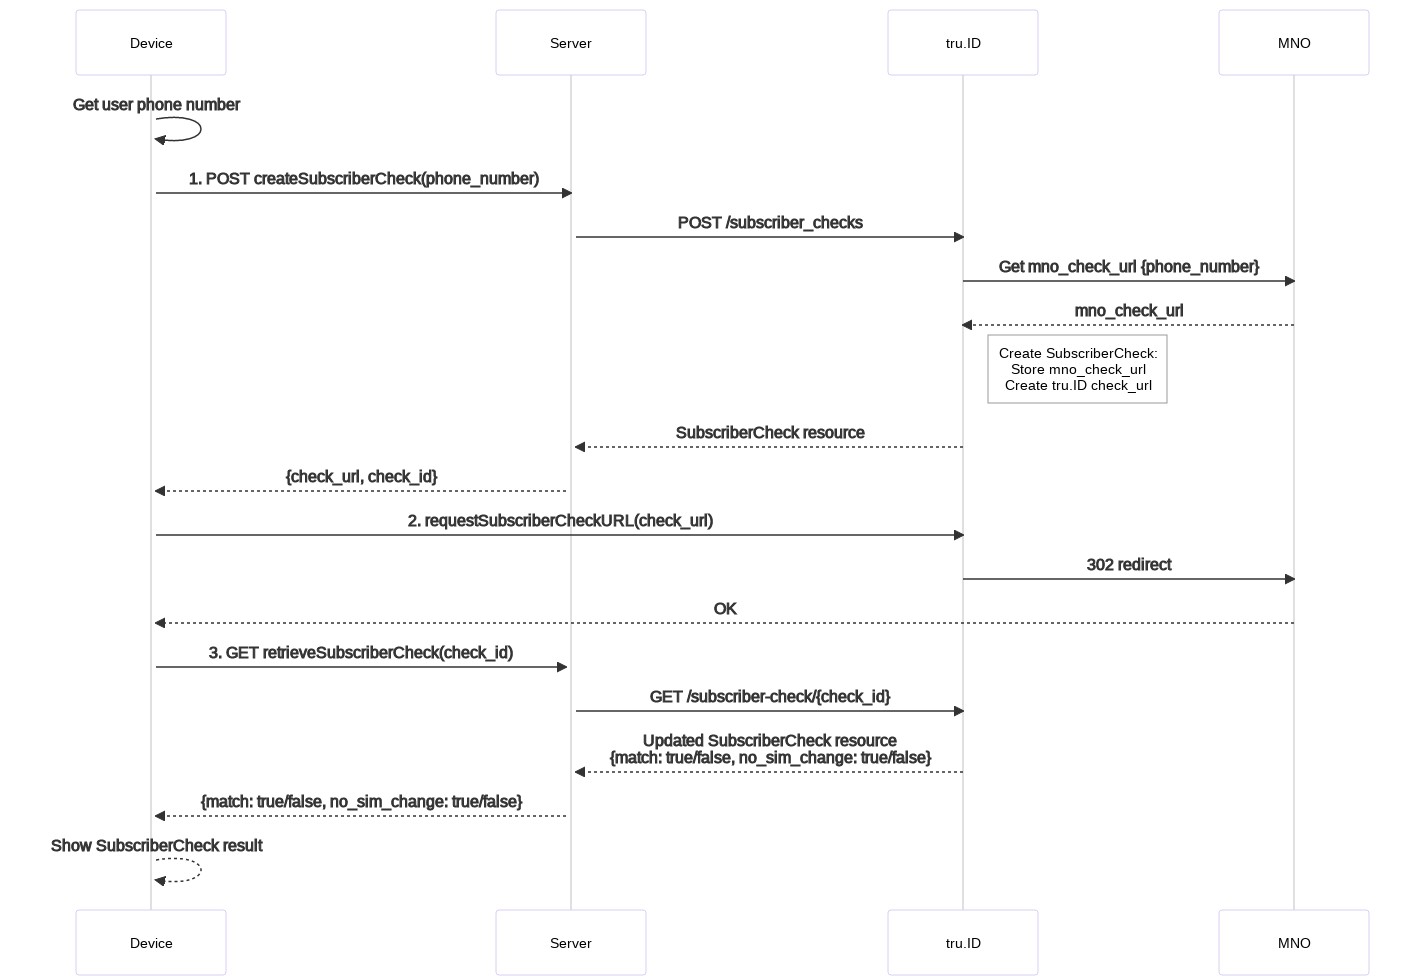
The SubscriberCheck workflow has three steps:
- Create a SubscriberCheck via the server. This will return a
check_idandcheck_url. - Then request the
check_urlretrieved in step 1 using the tru.ID iOS SDK - As soon as
check_urlrequest returns, retrieve the SubscriberCheck results using thecheck_idretrieved in step 1
The following sequence diagram shows each step, including the server to tru.ID API interactions:
Let's implement the workflow in SubscriberCheckService using some helper methods and the classes you created in the previous sections.
First, let's add a variable called endpoint to the SubscriberCheckService and initiate it in the init() method. The SubscriberCheckService class uses a concrete implementation of the Endpoint protocol called SessionEndpoint, which you defined in the previous sections. This class makes it easier to execute network calls.
final class SubscriberCheckService: Subscriber {let path = "/subscriber-check"let endpoint: Endpointinit(){self.endpoint = SessionEndpoint()}...}
Let's also define three methods, each corresponding to the abovementioned steps. Later, we will stitch the workflow steps in the check(phoneNumber: ...) method.
The first method is createSubscriberCheck(phoneNumber:...). It makes a POST request to the server to create a SubscriberCheck. You can make this call over any type of network connection (cellular/wifi). The server should return a SubscriberCheck check_url.
Add the following method to the SubscriberCheckService class:
private func createSubscriberCheck(phoneNumber: String,handler: @escaping (Result<SubscriberCheck, NetworkError>) -> Void) {let urlString = endpoint.baseURL + pathguard let url = URL(string: urlString) else {handler(.failure(.invalidURL))return}let phoneNumberDict = ["phone_number" : phoneNumber]let urlRequest = endpoint.createURLRequest(method: "POST", url: url, payload: phoneNumberDict)endpoint.makeRequest(urlRequest: urlRequest, handler: handler)}
This method receives a phone number and constructs the full URL using the endpoint.baseURL and the SubscriberCheck path defined by the server. It creates a payload (just the phone number), and a URLRequest using the endpoint.createURLRequest(..) method. Then the method uses the makeRequest(..) method of the endpoint and passes the urlRequest and the handler.
Our next method is called retrieveSubscriberCheck(..). Add it to the SubscriberCheckService class:
private func retrieveSubscriberCheck(checkId: String,handler: @escaping (Result<SubscriberCheck, NetworkError>) -> Void) {let urlString = endpoint.baseURL + path + "/" + checkIdguard let url = URL(string: urlString) else {handler(.failure(.invalidURL))return}let urlRequest = endpoint.createURLRequest(method: "GET", url: url, payload: nil)endpoint.makeRequest(urlRequest: urlRequest, handler: handler)}
This method is very similar to the first method you defined, with a few differences. You are now calling the endpoint with an extra checkId parameter, which is a GET call this time. This method will get the results of the check performed.
The third method we need to create is doing the heavy lifting using the tru.ID SDK. Let's create a method called requestSubscriberCheckURL(..):
private func requestSubscriberCheckURL(subscriberCheckURL: String,handler: @escaping () -> Void) {}
This method requests the check_url, which will be returned by the createSubscriberCheck(..). To do that, you need the tru.Id iOS SDK. Let's add it to our project.
The tru.ID iOS SDK ensures that certain network calls are done on a Cellular network type, which is needed to run the SubscriberCheck workflow. You have two options to add the SDK to your project.
Using Swift Package Manager
Xcode integrates well with Github, and you can easily add Swift Packages. In your Xcode, go to File -> Swift Packages -> Add Package Dependency...
Type https://github.com/tru-ID/tru-sdk-ios.git, and tap Next.
Xcode will find the package, select the latest version and then tap Finish to add it. Now that the SDK is added, you can import it when implementing the workflow.
Using CocoaPods
While we recommend using Swift Package Manager, tru.ID iOS SDK also supports adding your dependencies via CocoaPods. If you are familiar with CocoaPods and prefer using it, all you need to do is to create a Podfile and add the tru.ID pod the following way:
target 'MyApp' dopod 'tru-sdk-ios'end
Make sure to run pod install in your project directory. After the CocoaPods install all necessary pods and configure your project, don't forget to open the workspace rather than the project file.
Request the check_url
Let's go back to the SubscriberCheckService and import the TruSDK:
import TruSDK
Then use the SDK within requestSubscriberCheckURL(..) to request the check_url:
private func requestSubscriberCheckURL(subscriberCheckURL: String,handler: @escaping () -> Void) {let tru = TruSDK()tru.openCheckUrl(url: subscriberCheckURL) { (something) inhandler()}}
It's that simple.
As discussed, the SDK will ensure that this call will be made over the cellular network. When the openCheckUrl(..) calls the closure, you also call the handler.
You are yet to implement the SubscriberCheckService check(phoneNumber:...) method and chain the methods in our check(phoneNumber: String.. method. So, let's do that:
public func check(phoneNumber: String, handler: @escaping (Result<SubscriberCheck, NetworkError>) -> Void) {createSubscriberCheck(phoneNumber: phoneNumber) { (createResult) invar checkURL = ""var checkID = ""switch createResult {case .success(let subscriberCheck):// The server returns the SubscriberCheck results to the device.checkURL = subscriberCheck.check_url!checkID = subscriberCheck.check_id!print("Got the subscriber check URL: \(String(describing: subscriberCheck.check_url)) ")case .failure(let error):handler(.failure(error))return}print("Using the SDK to request check URL over mobile network")self.requestSubscriberCheckURL(subscriberCheckURL: checkURL) { [weak self] inguard let self = self else {return}print("SDK successfully returned, let's call our server to retrieve check results.")self.retrieveSubscriberCheck(checkId: checkID) { (checkResult) inswitch checkResult {case .success(let checkResultModel):handler(.success(checkResultModel))case .failure(let error):handler(.failure(error))}}}}}
First, you make a call using the createSubscriberCheck(phoneNumber: phoneNumber) ... method. The callback to this method inspects the Result<>. If it is a success, it fetches the checkURL and checkID and stores them in local variables, which will be used later.
You execute the second step within the callback using requestSubscriberCheckURL(...). This method uses the tru.ID iOS SDK and makes a call to check_url. The SDK makes this call over the cellular network, so the user must have a data plan. Behind the scenes, this call will redirect and eventually return OK. The SDK will handle all this.
The third step is to make a final request to the server using the checkID you've got as a result of making the first call. This call will return the SubscriberCheck result, whether the check is successful or not.
Perform your first SubscriberCheck
Now that our code is complete, you can run the application on an actual device. Remember that SIM card-based authentication is impossible on a Simulator, as you require a SIM Card with an active data connection.
You've now integrated SubscriberCheck into an iOS application, enabling you to both verify a phone number and check if the SIM card associated with the phone number has changed recently. All are powered by SIM card-based mobile authentication.
Where next?
- The completed sample app can be found in the tru.ID sim-card-auth-ios Github repository.
- Take a look at the tru.ID iOS SDK on GitHub
Troubleshooting
If you have any questions, please raise an issue on the GitHub repo.
Mobile Data is Required
Don't forget that the SubscriberCheck validation requires your mobile device to have a data plan from your network operator and that you should enable mobile data.
Get in touch
If you have any questions, contact help@tru.id.

