

The Vonage Verify API is an SMS with Voice fallback PIN code 2FA solution. It is used to verify that a user is in possession of a phone with a specific phone number. However, with SIM Swap cases on the rise, it's also important to detect if the SIM card associated with the phone number has changed recently. If it has, it could indicate that the user has been the victim of a SIM swap attack. This is where the tru.ID SIMCheck API comes in.
The tru.ID SIMCheck API provides information on when the SIM card associated with a mobile phone number was last changed. This adds an extra layer of security to your application login flows by indicating attempted SIM swap fraud. SIMCheck can be used to augment existing 2FA or anti-fraud workflows.
In this tutorial, we will be using the SIMCheck API to augment the Vonage Verify 2FA workflow.
If you'd prefer to dive into the completed code then head over to the GitHub repo.
Before you begin
The requirements for this project are:
Getting Started
Clone the starter-files branch via:
git clone -b starter-files https://github.com/tru-ID/2fa-sim-swap-detection-vonage.git
Getting set up with Vonage
You need to configure Vonage using your account credentials.
Copy the values of .env.example into a .env file via:
cd 2fa-sim-swap-detection-vonage && cp example.env .env
Open the .env file and configure the following values:
VONAGE_API_KEY: Your Vonage API key found on the developer dashboardVONAGE_API_SECRET: Your Vonage API key found on the developer dashboardVONAGE_BRAND_NAME: A name for your application which will appear on the home page and also in thefromfield of any SMS sent via the Verify API (up to 11 alphanumeric characters).
Getting set up with tru.ID
A tru.ID Account is needed to make the SIMCheck API requests, so make sure you've created one.You're also going to need some Project credentials from tru.ID to make API calls. So sign up for a tru.ID account, which comes with some free credit. We've built a CLI for you to manage your tru.ID account, projects, and credentials within your Terminal. To install the tru.ID CLI run the following command:npm install -g @tru_id/cli
tru login <YOUR_IDENTITY_PROVIDER> (this is one of google, github, or microsoft) using the Identity Provider you used when signing up. This command will open a new browser window and ask you to confirm your login. A successful login will show something similar to the below:Success. Tokens were written to /Users/user/.config/@tru_id/cli/config.json. You can now close the browser
config.json file contains some information you won't need to modify. This config file includes your Workspace Data Residency (EU, IN, US), your Workspace ID, and token information such as your scope.Create a new tru.ID project within the root directory with the following command:tru projects:create sms-2fa-vonage --project-dir .
Configure the following values in your .env:
TRU_ID_CLIENT: The client ID found in thetru.jsonfile in the newly created tru.ID project.TRU_ID_SECRET: The client secret found in thetru.jsonfile in the newly created tru.ID project.
Finally, install dependencies by running:
npm install
Starting the project
To start the project, run the following in the terminal:
npm start
The project should look like this:
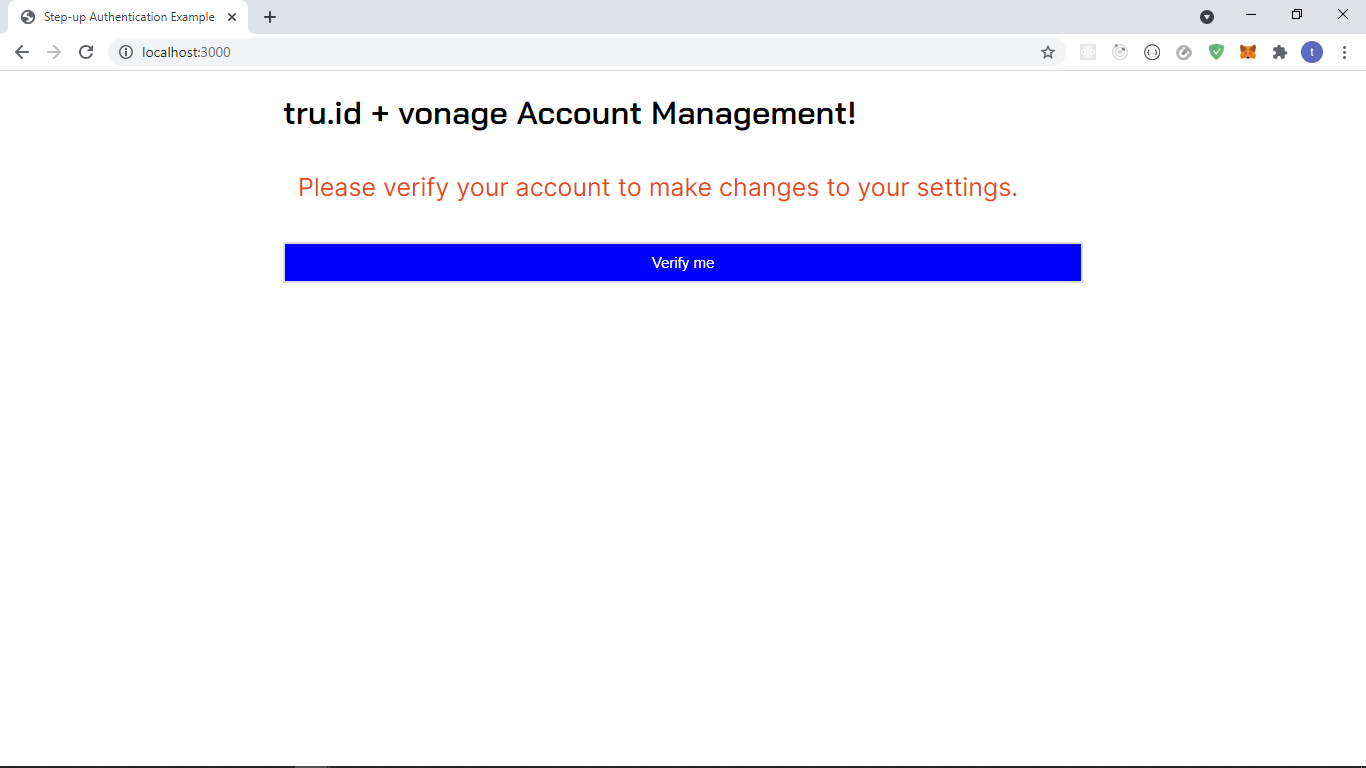
Existing app workflow
The current workflow from the base is as follows:
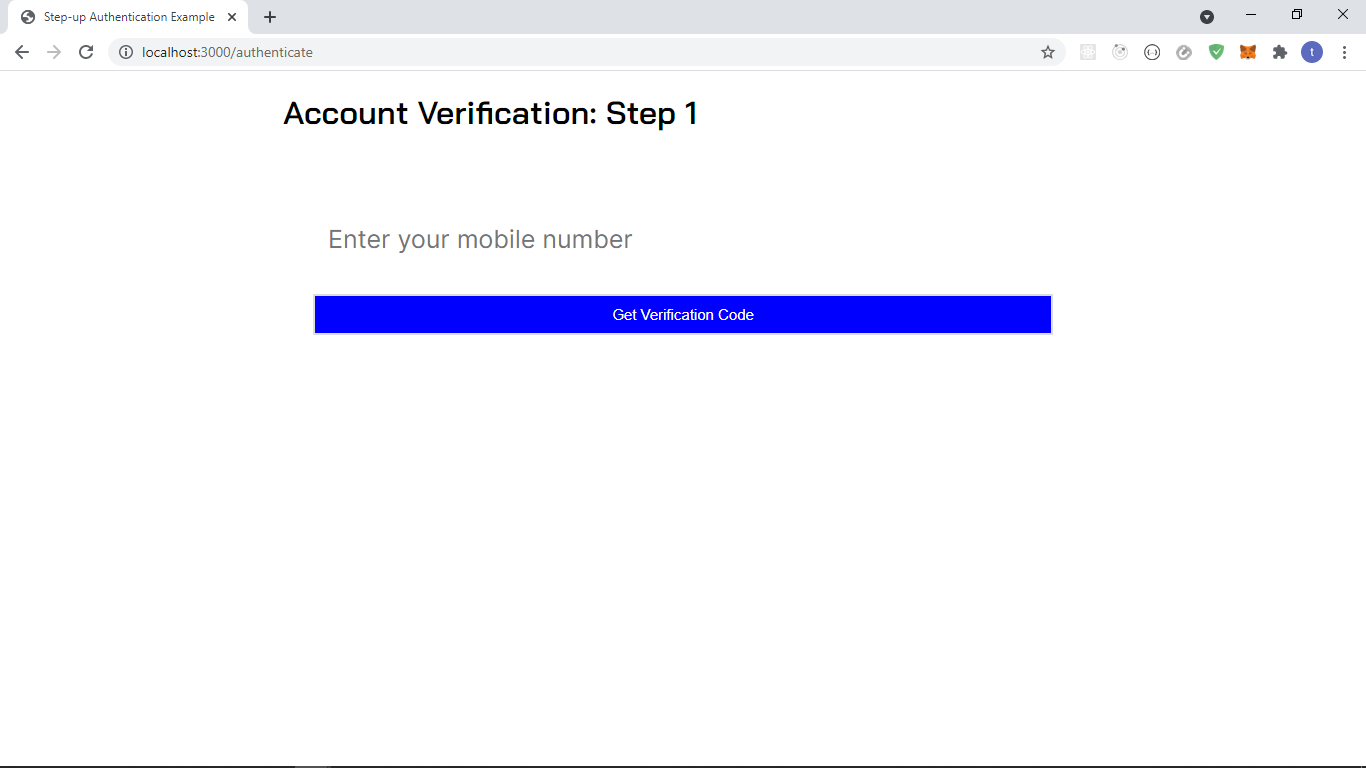
- App opens up in
/. If the user is verified, it shows their phone number and other information with acancelbutton to "log out". If the user is not verified, they can verify by clicking theVerify Mebutton. - User inputs their phone number and gets taken to the
/entercoderoute where the user can input the OTP generated. - The user inputs the OTP code, and if it's valid, the user gets redirected to
/.
Workflow with the SIMCheck API
- App opens up in
/. If the user is verified, it shows their phone number and other information with acancelbutton to "log out". If the user is not verified they can verify by clicking theVerify Mebutton. - User inputs their phone number and SIMCheck is performed before OTP generation.
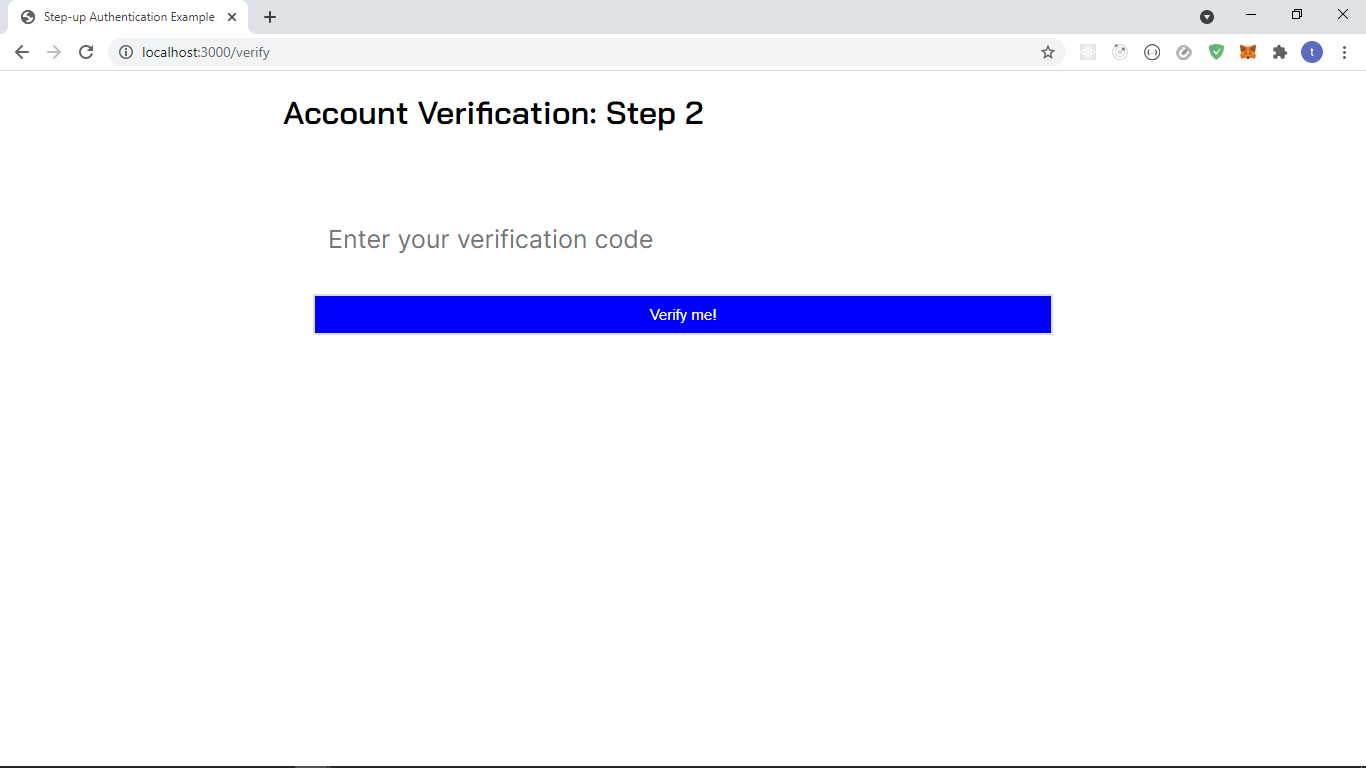
- If the SIMCheck is successful, the user gets taken to the
/entercoderoute, where the user can input the OTP generated. If the SIMCheck fails, the user is taken to a/sim-change-detectedroute. - The user inputs the OTP code, and if it's valid, the user gets redirected to
/.
Performing the SIMCheck
In order to perform the SIMCheck we need to do two things:
- Create a tru.ID access token.
- Create a SIMCheck using the newly generated access token.
In order to do either of these things, we need to bring in a few packages. Open a new terminal and run:
npm install --save btoa node-fetch@2
btoa transforms data to base-64 encoded format, and node-fetch provides an easy way to make HTTP network requests in our Node applications.
Creating the tru.ID Access Token
In order to create the access token, create a new directory (folder) called helpers, create a createAccessToken.js file, and paste the following:
const btoa = require('btoa')const fetch = require('node-fetch')exports.createAccessToken = async () => {/* make request body acceptable by application/x-www-form-urlencoded*/const clientID = process.env.TRU_ID_CLIENTconst clientSecret = process.env.TRU_ID_SECRETconst basicAuth = btoa(`${clientID}:${clientSecret}`)const resp = await fetch(`https://{data_residency}.api.tru.id/oauth2/v1/token`,{method: 'POST',body: 'grant_type=client_credentials&scope=sim_check',headers: {'Content-Type': 'application/x-www-form-urlencoded',Authorization: `Basic ${basicAuth}`,},},)const { access_token } = await resp.json()return access_token}
To create an access token, we make a form URL encoded POST request to the https://{data_residency}.api.tru.id/oauth2/v1/token endpoint. This endpoint uses basic auth so requires an Authorization header.
The header value is your tru.ID project client_id and client_secret, which you saved to the .env file earlier, concatenated with a colon (:) and Base64 encoded.
The body is set to have a grant_type of client_credentials and scope of sim_check. This instructs the tru.ID OAuth2 provider that the created Access Token should have permissions to use SIMCheck resources.
Creating the SIMCheck
In the helpers directory, create a file named performSimCheck.js and paste the following:
const fetch = require('node-fetch')exports.performSimCheck = async (phoneNumber, accessToken) => {let simChangedlet numberSupported = trueconst body = JSON.stringify({ phone_number: phoneNumber })const response = await fetch(`https://{data_residency}.api.tru.id/sim_check/v0.1/checks`,{method: 'POST',body,headers: {Authorization: `Bearer ${accessToken}`,'Content-Type': 'application/json',},},)if (response.status === 201) {const data = await response.json()console.log(data)simChanged = !data.no_sim_change} else if (response.status === 400) {numberSupported = false} else {throw new Error(`Unexpected API response ${res.status}`, res.toString())}return { simChanged, numberSupported }}
Here, we accept a phoneNumber in E.164 format, the accessToken from the previous step, and create the SIMCheck resource. A successful SIMCheck resource creation response is represented by a 201 HTTP status code. The payload response provides information on whether the SIM has changed or not, and we have two variables: simChanged and numberSupported, that we set based on the API response.
A sample successful response is:
{"_links": {"self": {"href": "https://{data_residency}.api.tru.id/sim_check/v0.1/c6-bbae-50358ae3bb08"}},"check_id": "2563f2a6-0b9e-49c6-bbae-50358ae3bb08","status": "COMPLETED","no_sim_change": true,"charge_amount": 1,"charge_currency": "API","created_at": "2021-04-13T14:49:29+0000","snapshot_balance": 100}
A 400 HTTP status may be returned if tru.ID doesn't support the phone number. An example of that is as follows:
{type: 'https://tru.id/docs/api-errors#mno_not_supported',title: 'Bad Request',status: 400,detail: '400 Bad Request Mobile Network Operator Not Supported'}
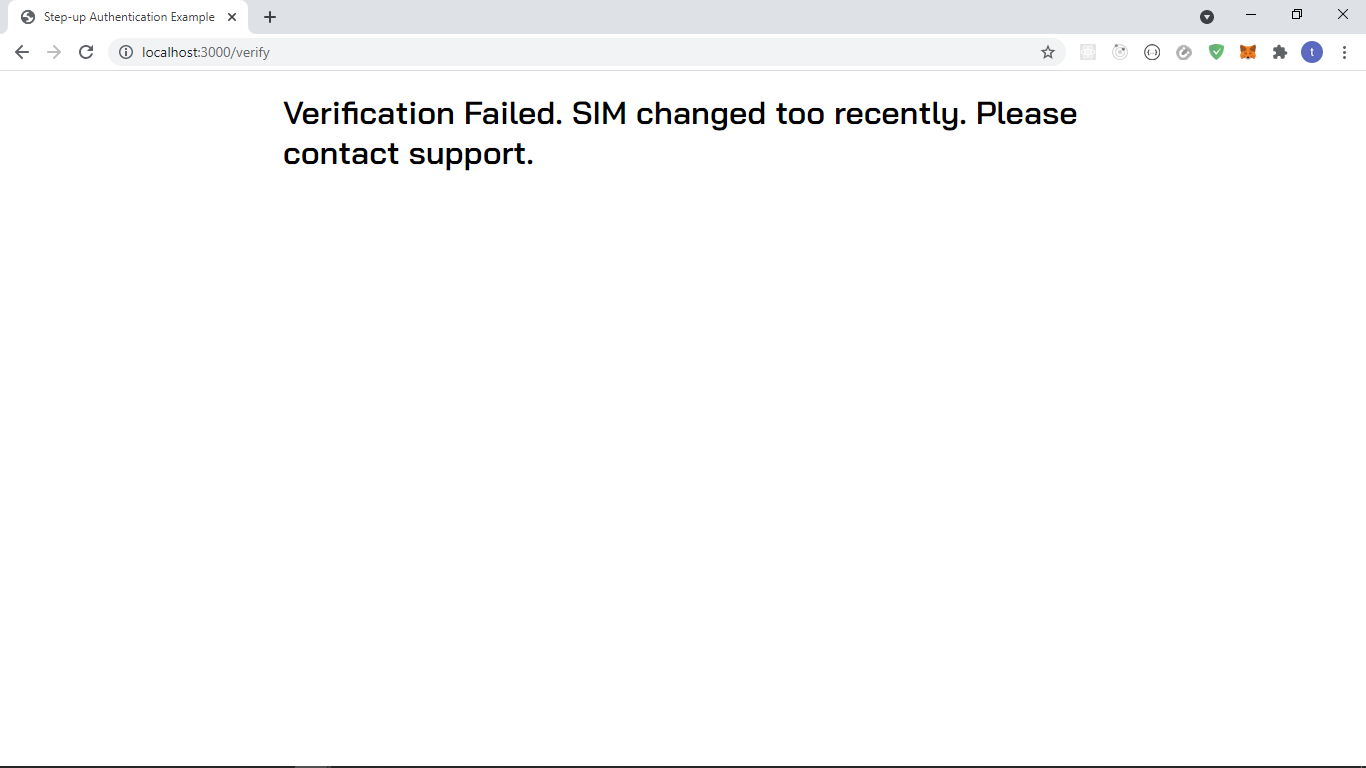
Handling Failure
We need to handle the following scenarios:
- The SIM changed recently, indicated by
simChangedbeingtrue - tru.ID cannot perform a lookup on the phone number, resulting in
numberSupportedbeingfalse
To do this, head over to the views directory and create a file named: error.pug and paste the following code:
extends layoutblock contenth1.text-center #{error}
Here we accept a dynamic error value, which renders the error message to the screen.
The view should look like this if the SIM changed recently:
Integrating our helper functions
Next, we need to integrate our helper functions.
Add the imports to the top of server.js:
const { createAccessToken } = require('./helpers/createAccessToken')const { performSimCheck } = require('./helpers/performSimCheck')
Update the app.post('/verify', (req, res) => {} function with the following, remembering to make the function async:
app.post('/verify', async (req, res) => {// Start the verification processverifyRequestNumber = req.body.number;// create access tokenconst accessToken = await createAccessToken();// perform SIMCheckconst { numberSupported, simChanged } = await performSimCheck(verifyRequestNumber,accessToken);console.log(verifyRequestNumber);if (simChanged === true) {return res.render('error', {error:'Verification Failed. SIM changed too recently. Please contact support.',});}if (numberSupported === false) {return res.render('error', {error:'Verification Failed. We do not support the phone number. Please contact support.',});}// vonage.verify.request...
Here we do the following:
- Create a tru.ID access token via our helper method.
- Perform a SIMCheck, passing the access token and the phone number.
- If
simChangedequalstrue, the SIM changed recently and we render ourerrorview passing in a dynamic error message. - If
numberSupportedisfalsewe got a400so return our dynamic error view, passing in the error message. - If the SIM hasn't changed recently we continue and create the SMS OTP with Vonage.
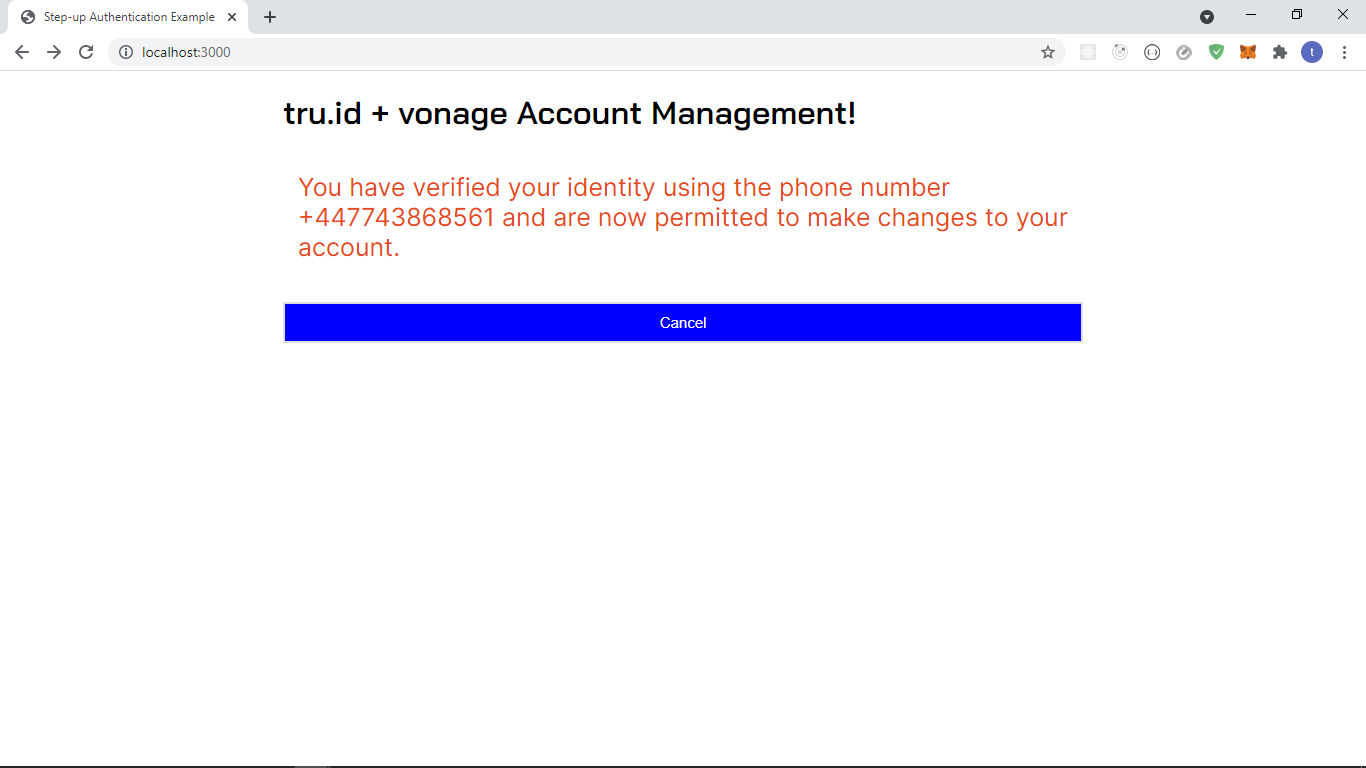
The views for a successful scenario should look like this:
Wrapping up
That's it! That's how simple it is to add SIM Swap detection to your existing Vonage Verify 2FA application with tru.ID's SIMCheck API.
You can view the difference between the Vonage base and the finished app here.

