

Authenticating a user requires at least one of three factors:
- Knowledge (something you know; usually a password or a PIN code)
- Inherence (something you are; biometrics such as fingerprint or facial recognition)
- Possession (something you have; ubiquitously a mobile phone, especially on the mobile web).
When used as a possession factor, phone numbers are usually verified using an SMS message or a phone call. But this mechanism is flawed from a security perspective, as your SIM can be hijacked by SIM Swap attackers.
Now, however, there’s an easier way: use the power of the SIM card to verify the user's mobile phone number.
Mobile Network Operators have recently introduced a new service called NumberVerify (note: available globally). NumberVerify checks the mobile number entered on a website or web app, ensuring the number provided matches the customer's account.
NumberVerify phone verification requires a web request to be made over mobile data. At the moment, there is no way to force a network request to go over cellular data on mobile browsers, meaning users that are not connected to the mobile network would theoretically be unable to use NumberVerify.
So, how does passwordless authentication work on the mobile web? In this tutorial we'll show you how to verify a phone number in a mobile web application using the tru.ID PhoneCheck API and the tru.ID web SDK.
Before you begin
To get started you'll need:
Clone the starter-files branch and navigate into the repo directory via:
git clone -b starter-files https://github.com/tru-ID/passwordless-auth-webcd passwordless-auth-web
If you're only interested in the finished code in main then run:
git clone -b main https://github.com/tru-ID/passwordless-auth-web.git
npm install -g @tru_id/cli
tru login <YOUR_IDENTITY_PROVIDER> (this is one of google, github, or microsoft) using the Identity Provider you used when signing up. This command will open a new browser window and ask you to confirm your login. A successful login will show something similar to the below:Success. Tokens were written to /Users/user/.config/@tru_id/cli/config.json. You can now close the browser
config.json file contains some information you won't need to modify. This config file includes your Workspace Data Residency (EU, IN, US), your Workspace ID, and token information such as your scope.Create a new tru.ID project within the root directory with the following command:tru projects:create passwordless-auth-web --project-dir .
Start the app
To start the app, first install dependencies via:
npm install
Then run
npm start
Open an ngrok terminal and paste the following:
ngrok http 4000
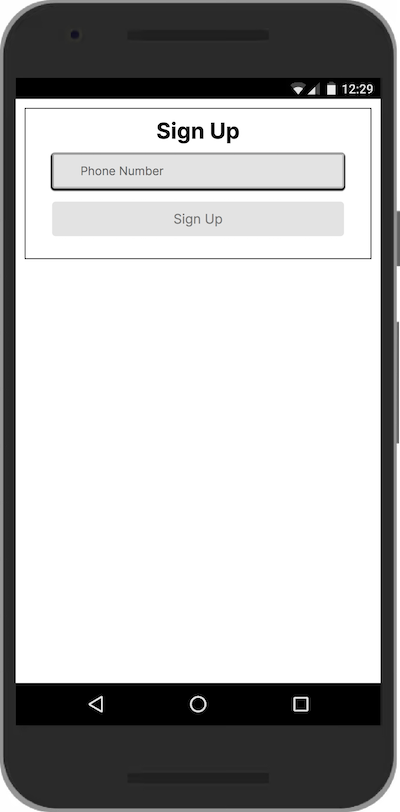
Navigate to http://localhost:4000 to see the baseline application that we'll build on top of. You can navigate to the public ngrok URL on your mobile phone to test out the application as you go too.
Application structure
The contents of the app will look similar to the following:
.├── LICENSE├── README.md├── client│ ├── index.html│ ├── src│ │ ├── helpers│ │ │ ├── loader.js│ │ │ └── variables.js│ │ └── index.js│ └── styles│ └── style.css├── package.json├── server/index.js└── tru.json
The client directory contains assets that are served from the route of the web server. The entry point is index.html, with the key contents being:
- a
<form> - a
<div class="message"></div>to render inline messages - an
<input type="tel" />for the user's phone number - a
<button>to submit the form
We have a client/src/helpers folder containing a loader.js file which is used to toggle a loading spinner for user feedback, and a variables.js class containing references to the above key DOM nodes we will be using.
client/src/index.js is the main JavaScript entry point where we'll add all our client code.
The server/index.js file serves the client and also defines API endpoints used by the client. We'll get back to that later.
WiFi detection
The first step is to detect if the user is on WiFi or a mobile network, as the tru.ID verification mechanism requires an HTTP request to be made over the mobile data network. Thus, the device should have an IP address associated with a mobile network operator.
In order to detect this, we'll use the tru.ID Reachability API directly from the mobile web client because it requires no authentication. The API gets the mobile network that a device is on, along with a list of products that are supported based on the sender device IP address.
In the client directory, navigate to src/index.js and add the following:
import {messageElement,inputElements,phoneNumberElement,formElement,} from './helpers/variables'import { toggleLoading } from './helpers/loader'const ErrorMessages = {400: 'We cannot presently register you because we do not have coverage for your mobile network operator.',412: `To enable signup, please disable your WiFi so that your phone number can be verified using your cellular data connection.Once disabled, please <span class="link" onclick="window.location.reload()">reload the page</a> in the browser.`,500: 'An unknown error occurred.',}window.addEventListener('load', async () => {// check if user is making request via a mobile networkconst deviceCoverageResponse = await fetch('https://{data_residency}.api.tru.id/public/coverage/v0.1/device_ip',)console.log(deviceCoverageResponse)if (deviceCoverageResponse.status === 200) {for (let input of inputElements) {input.removeAttribute('disabled')}} else if (deviceCoverageResponse.status >= 400) {messageElement.innerHTML = ErrorMessages[deviceCoverageResponse.status]messageElement.style.display = 'block'} else {messageElement.innerHTML = ErrorMessages[500]messageElement.style.display = 'block'}})
First, this includes the helpers we mentioned earlier.
The rest of the code focuses on making a GET request to the Reachability API to determine if tru.ID has reach for the device. If the API response status code is 200 then tru.ID can perform a PhoneCheck so the input elements within the UI can be enabled.
If the status is greater than 400, we perform a lookup on the reason for the error via ErrorMessages and inject that message into the page via messageElement.innerHTML.
If the status is any other value, we default to showing the error message associated with a 500 response.
Let's dig into the 4** status codes a bit more:
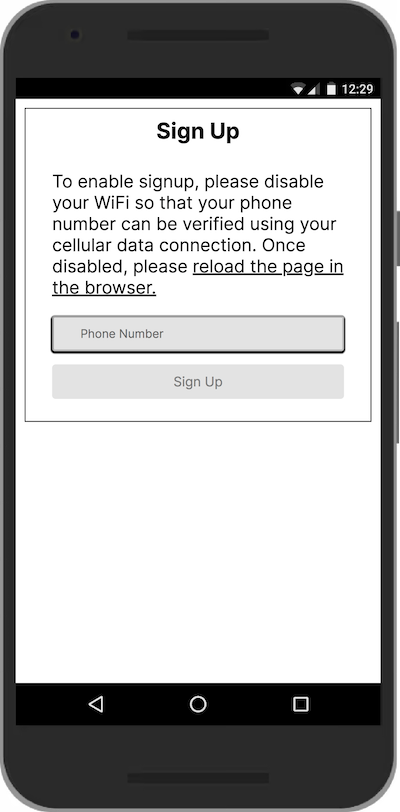
- If the error was a
412, it means that the device is on WiFi, so we ask the user to disable WiFi and reload the page. - If the error was a
400, then tru.ID has determined that the device is a mobile device (has a mobile IP address) but the platform does not presently have coverage for the associated mobile network operator (MNO).
With a 412 response the UI looks as follows:
With a 200 response, indicating that tru.ID has recognised a mobile IP address, the UI looks as follows:
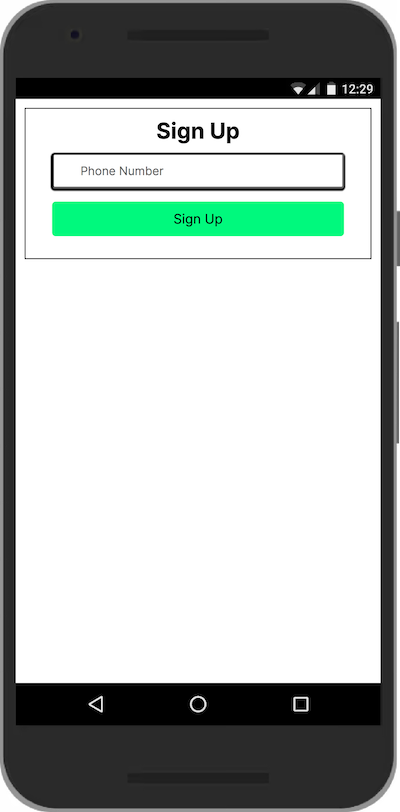
To see the above, you'll need to access the public ngrok URL on your phone with WiFi turned off. You'll also need to be a on a mobile data network supported by tru.ID.
Get the phone number
Now that the UI is enabled, we need to get the user's phone number from the form element when the form is submitted.
formElement.addEventListener('submit', async (e) => {e.preventDefault()const phoneNumber = phoneNumberElement.value.replace(/\s+/g, '')console.log(phoneNumber)})
Above, we handle the form submit event on the formElement (included via the /helpers/variables helper), and within that, get the value of the phone number from the phoneNumberElement element, stripping out any whitespace.
Create a PhoneCheck
Now that we have the phone number we need to create the PhoneCheck for it. In order to do this we need to do a few things:
- Make a
POSTrequest to/api/phone-check. - Create a tru.ID access token on the server.
- Create a PhoneCheck resource using the newly generated access token, getting back
check_urlandcheck_idproperties in our response, and sending them to the web client.
In the client/src/index.js, create a createPhoneCheck utility function and update the form submit handler to use it:
formElement.addEventListener('submit', async (e) => {e.preventDefault()const phoneNumber = phoneNumberElement.value.replace(/\s+/g, '')toggleLoading(true)const phoneCheck = await createPhoneCheck(phoneNumber)console.log('PhoneCheck creation result', phoneCheck)})async function createPhoneCheck(phoneNumber) {const body = { phone_number: phoneNumber }console.log('tru.ID: Creating PhoneCheck for', body)const response = await fetch('/api/phone-check', {method: 'POST',headers: {'Content-Type': 'application/json',},body: JSON.stringify(body),})return response.json()}
Upon form submission, we call the toggleLoading helper function, passing in true to start the loading spinner. This gives the user feedback that the application is doing work; in this case, a HTTP network request is taking place.
We then make a POST request and pass the phone number in a JSON payload. For the moment, the result of the request is logged to the console.
Although the server-side functionality isn't fully implemented yet, a /api/phone-check route is defined to handle a POST request and will return an empty JSON payload.
To create the PhoneCheck on the server we need to:
- Create a tru.ID access token
- Create a PhoneCheck resource, passing in the phone number and access token, which returns
check_urlandcheck_idparameters
In order to do any of the above on the server we need to bring in a package. Run the following in the terminal within your repo directory:
npm install --save node-fetch
node-fetch provides an easy way to make HTTP network requests in our Node.js applications using the same interfaces as fetch in the web browser.
Create the access token
In order to create the access token, create a new directory (folder) named helpers within the server directory. Within helpers, create a file named createAccessToken.js and paste the following:
const fetch = require('node-fetch')const path = require('path')// Load the tru.ID credentials to be used to create access tokensconst truIdConfig = require(path.join(__dirname, '../../tru.json'))const clientId = truIdConfig.credentials[0].client_idconst clientSecret = truIdConfig.credentials[0].client_secretexports.createAccessToken = async () => {// make request body acceptable by application/x-www-form-urlencodedconst basicAuth = Buffer.from(`${clientId}:${clientSecret}`).toString('base64',)const resp = await fetch(`https://{data_residency}.api.tru.id/oauth2/v1/token`,{method: 'POST',body: 'grant_type=client_credentials&scope=phone_check',headers: {'Content-Type': 'application/x-www-form-urlencoded',Authorization: `Basic ${basicAuth}`,},},)const { access_token } = await resp.json()return access_token}
To create an access token, we make a form URL encoded POST request to the https://{data_residency}.api.tru.id/oauth2/v1/token endpoint. This endpoint uses basic auth so requires an Authorization header.
The header value is your tru.ID project client_id and client_secret, which you saved to the .env file earlier, concatenated with a colon (:) and Base64 encoded.
The body is set to have a grant_type of client_credentials and scope of phone_check. This instructs the tru.ID OAuth2 provider that the created Access Token should have permissions to use PhoneCheck resources.
Please note that in this code a new access token is generated for each request. However, in a real world environment, you should only create a new access token if the previous one has expired.
Create the PhoneCheck
Next we have to create the PhoneCheck. To do that, create a server/helpers directory in the root directory, then create a file called createPhoneCheck.js and paste the following:
const fetch = require('node-fetch')const { createAccessToken } = require('./createAccessToken')exports.createPhoneCheck = async (phoneNumber) => {let checkUrllet checkIdconst accessToken = await createAccessToken()const body = JSON.stringify({ phone_number: phoneNumber })const response = await fetch(`https://{data_residency}.api.tru.id/phone_check/v0.1/checks`,{method: 'POST',body,headers: {Authorization: `Bearer ${accessToken}`,'Content-Type': 'application/json',},},)if (response.status === 201) {const data = await response.json()console.log(data)checkUrl = data._links.check_url.hrefcheckId = data.check_id} else {throw new Error(`Unexpected API response ${response.status}`,response.toString(),)}return { checkId, checkUrl }}
To create the PhoneCheck we pass in a phone number in E.164 format and the newly created access token. We then make a POST request to the PhoneCheck endpoint using the phoneNumber and the access token to create a PhoneCheck resource.
If we receive a status code of 201 (created), we know the POST was successful and we save the values of check_url and check_id.
If something else goes wrong, we throw an error.
First, at the top of server/index.js, add the following to the list of imports:
const { createPhoneCheck } = require('./helpers/createPhoneCheck')
Next, update app.post('/api/phone-check') to the following:
// create PhoneCheckapp.post('/api/phone-check', async (req, res) => {const { phone_number: phoneNumber } = req.bodytry {// create PhoneCheck resourceconst { checkId, checkUrl } = await createPhoneCheck(phoneNumber)res.status(201).send({data: { checkId, checkUrl },message: 'PhoneCheck created',})} catch (e) {res.status(500).send({ message: e.message })}})
Above, we get the phone number from req.body and remap it to phoneNumber, and then create the PhoneCheck using our helper function, passing in the phoneNumber.
We return a 201 status code and checkId & checkUrl payload to the mobile web client. We also catch any errors and respond with a 500 and the error message.
Request The Check URL
The next step is to request the check_url on the mobile web. For that, we need to bring in the tru.ID web SDK.
Install the tru.ID Web SDK dependency:
npm install --save @tru_id/tru-sdk-web
Add relevant imports to the top of client/src/index.js:
import TruSDK from '@tru_id/tru-sdk-web'
Update formElement.addEventListener to the following:
formElement.addEventListener('submit', async (e) => {e.preventDefault()const phoneNumber = phoneNumberElement.value.replace(/\s+/g, '')toggleLoading(true)const phoneCheck = await createPhoneCheck(phoneNumber)console.log('PhoneCheck creation result', phoneCheck)await TruSDK.openCheckUrl(phoneCheck.data.checkUrl)})
Here, we open the Check URL via our SDK by passing in the checkUrl variable. This request triggers the phone verification with the mobile network operator over the cellular network.
Get the PhoneCheck result
Now that we've successfully opened the Check URL the last step is to get the PhoneCheck result.
Underneath createPhoneCheck, let's create a function to get the PhoneCheck result:
async function getPhoneCheck(checkId) {console.log('tru.ID: Getting PhoneCheck Result passing in: ', checkId)const response = await fetch(`/api/phone-check/${checkId}`)return response.json()}
This function receives the checkId, passes it to the route as a route parameter, and performs a GET request. The server will return a response informing the mobile web client if the phone number has been verified.
Update formElement.addEventListener to the following:
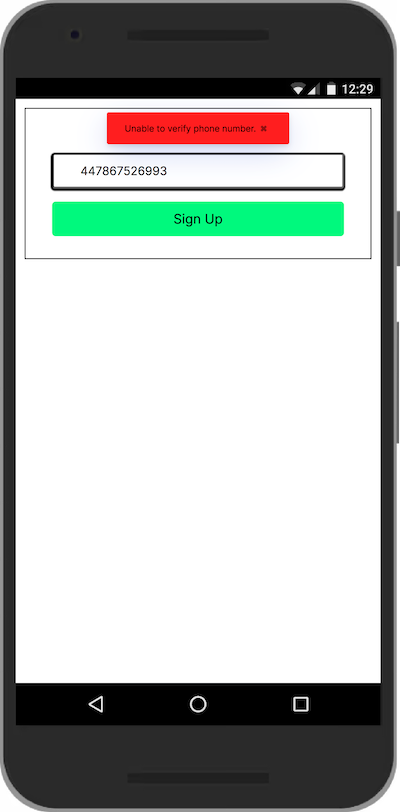
import Toastify from 'toastify-js'import 'toastify-js/src/toastify.css'formElement.addEventListener('submit', async (e) => {e.preventDefault()const phoneNumber = phoneNumberElement.value.replace(/\s+/g, '')toggleLoading(true)const phoneCheck = await createPhoneCheck(phoneNumber)console.log('PhoneCheck creation result', phoneCheck)await TruSDK.openCheckUrl(phoneCheck.data.checkUrl)const phoneCheckResult = await getPhoneCheck(phoneCheck.data.checkId)console.log('PhoneCheck result', phoneCheckResult)if (phoneCheckResult.data.match === true) {toggleLoading(false)Toastify({text: 'Successfully Signed Up',duration: 3000,close: true,gravity: 'top',position: 'center',backgroundColor: '#00ff00',style: {color: '#000',},stopOnFocus: true,}).showToast()} else {// we have a matchtoggleLoading(false)Toastify({text: 'Unable to verify phone number.',duration: 3000,close: true,gravity: 'top',position: 'center',backgroundColor: '#f00',style: {color: '#000',},stopOnFocus: true,}).showToast()}})
Here, we first import a toast notification library called Toastify.
We await the result of the getPhoneCheck function and if we have a match (phoneCheckResult.data.match === true) we display a success toast notification. Otherwise, we display a failure toast. Since we've not yet implemented the server functionality, only the failure path will be executed.
Finally, we need to implement this logic on the server-side to get the result of the PhoneCheck.
Create a helper method for getting the PhoneCheck response. To do this, in server/helpers create a file named getPhoneCheck.js, and add the following:
const fetch = require('node-fetch')const { createAccessToken } = require('./createAccessToken')exports.getPhoneCheck = async (checkId) => {const accessToken = await createAccessToken()const response = await fetch(`https://{data_residency}.api.tru.id/phone_check/v0.1/checks/${checkId}`,{method: 'GET',headers: {Authorization: `Bearer ${accessToken}`,'Content-Type': 'application/json',},},)const { match } = await response.json()return { match }}
Here, we make a GET request to the PhoneCheck resource using the checkId passed in as the route parameter. The request is authenticated using the access token created with the createAccessToken helper function.
The GET request returns a match property which indicates whether the phone number was verified by the mobile network operator.
In server/index.js, add the following import to the top:
const { getPhoneCheck } = require('./getPhoneCheck')
Update app.get('/api/phone-check') to the following:
app.get('/api/phone-check/:checkId', async (req, res) => {// get the `check_id` from the query parameterconst { checkId } = req.paramstry {const { match } = await getPhoneCheck(checkId)console.log(match)res.status(200).send({ data: { match } })} catch (e) {res.status(500).send({ message: e.message })}})
Above, we get the value of the checkId route parameter. Afterwards, we get the PhoneCheck response using our helper method and pass in the access token and the checkId parameter.
We then simply respond with a 200 and send the value of match in the response payload.
If there is a problem, we catch any errors, respond with a 400 and send the message as the response payload.
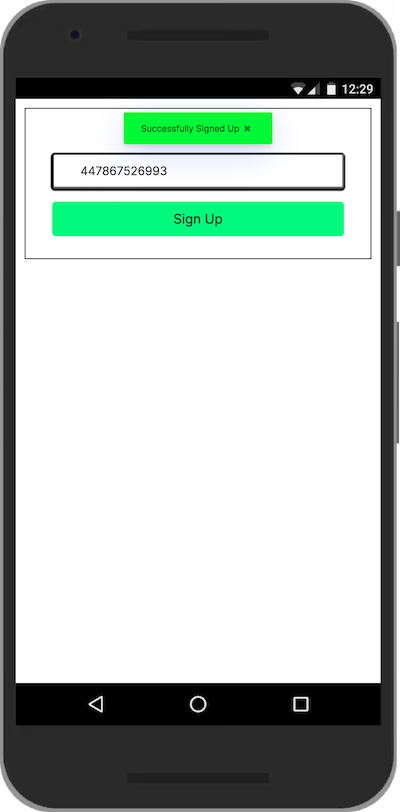
If we have a match, the UI will look like this:
There you have it! You've successfully implemented passwordless authentication using the mobile phone's SIM card on the mobile web.

