
Ionic is a framework that allows you to build cross-platform for native iOS, Android, or the web, using one codebase. It provides a set of mobile UI components for use across iOS and Android.
Ionic is limited in that it provides a UI toolkit and access to some core APIs, but does not allow you to extend or write custom native functionality, so the Ionic team created Capacitor. Capacitor provides a consistent, web-focused set of APIs that enable an app to stay as close to web standards as possible while accessing rich native device features on platforms that support them.
In this tutorial, you'll learn how to add passwordless authentication to your Ionic 5 Capacitor projects using the new tru.ID Ionic / Capacitor plugin and the tru.ID PhoneCheck API.
Before you begin
To follow along with this tutorial, you'll need:
- A mobile phone with an active data SIM card
- Ionic Tooling installed
- Android Studio
- XCode >=12
- JDK >=8
Getting Started
To install Ionic tooling, run the following in the terminal:
npm install -g @ionic/cli native-run cordova-res
Clone the Github repository and check out the starter-files branch to follow this tutorial using the command below in your Terminal:
git clone -b starter-files https://github.com/tru-ID/ionic-plugin-example-app.git
If you're only interested in the finished code in main, then run:
git clone -b main https://github.com/tru-ID/ionic-plugin-example-app.git
npm install -g @tru_id/cli
tru login <YOUR_IDENTITY_PROVIDER> (this is one of google, github, or microsoft) using the Identity Provider you used when signing up. This command will open a new browser window and ask you to confirm your login. A successful login will show something similar to the below:Success. Tokens were written to /Users/user/.config/@tru_id/cli/config.json. You can now close the browser
config.json file contains some information you won't need to modify. This config file includes your Workspace Data Residency (EU, IN, US), your Workspace ID, and token information such as your scope.Create a new tru.ID project within the root directory with the following command:tru projects:create ionic-auth --project-dir .
ionic-auth directory and run the following command to clone the dev-server:git clone git@github.com:tru-ID/dev-server.git
dev-server directory, run the following command to create a.env copy of .env.example:cp .env.example .env
.env file, update the values of TRU_ID_CLIENT_ID andTRU_ID_CLIENT_SECRET with your client_id and client_secret in yourtru.json file.dev-server to the Internet for your mobile application to access your backend server. For this tutorial, we're using ngrok, which we've included in the dev-server functionality. So to start with, uncomment the following and populate them with your ngrok credentials:NGROK_ENABLED=true#NGROK_SUBDOMAIN=a-subdomain # Uncommenting this is optional. It is only available if you have a paid ngrok account.NGROK_AUTHTOKEN=<YOUR_NGROK_AUTHTOKEN> # This is found in the ngrok dashboard: https://dashboard.ngrok.com/get-started/your-authtokenNGROK_REGION=eu # This is where your ngrok URL will be hosted. If you're using tru.ID's `eu` data residency; leave it as is. Otherwise, you could specify `in` or `us`.
dev-server directory, run the following two commands:npm install # Installs all third-party dependencies in package.jsonnpm run dev # Starts the server
With the ngrok URL provided, copy this value and update the BASE_URL value found within src/pages/Home.tsx.
Finally, install dependencies in your terminal using the following:
npm install
Get the user's phone number
To get the user's phone number, you need to update the UI and the state in the file src/pages/Home.tsx.
Inside the Home function, add the definition of two states – phoneNumber and loading – as shown below:
const Home: React.FC = () => {const [phoneNumber, setPhoneNumber] = useState('')const [loading, setLoading] = useState(false)...
Now add the following UI components below the line: </IonHeader>:
<IonContent fullscreen><IonItem className="center margin-top"><IonInputvalue={phoneNumber}className="input"autocapitalize="off"type="tel"placeholder="Phone Number ex. +4433234454"onIonChange={(e) => setPhoneNumber(e.detail.value!)}clearInput></IonInput></IonItem>{loading ? (<div className="center margin-top"><IonSpinner /></div>) : (<IonButtonexpand="block"color="success"shape="round"onClick={submitHandler}>Submit</IonButton>)}</IonContent>
The file starts with the phoneNumber and loading states. The phoneNumber is bound to the IonInput element. This element is a special Input component Ionic provides, which sets the value of the Input to the value provided by the user.
The loading state indicates that something (an HTTP request) is happening in the background, and the application gives the user a visual cue (<IonSpinner/>).
The last thing needed is to bind the empty submitHandler function to an IonButton button.
Submit the user's phone number
Before submitting the user's phone number and creating the PhoneCheck, the application must check if the user's mobile operator supports the PhoneCheck API. For this, the app will use the tru.ID Ionic / Capacitor plugin. Install this plugin in the terminal with the following command:
npm install @tru_id/tru-plugin-ionic-capacitor
To use this plugin in the project, add the import to the top of src/pages/Home.tsx
import { TruPluginIonicCapacitor } from '@tru_id/tru-plugin-ionic-capacitor'
Now, replace the line const submitHandler = async () => {}; with the following:
const submitHandler = async () => {const body = JSON.stringify({ phone_number: phoneNumber })console.log(body)try {setLoading(true)const reachabilityDetails = await TruPluginIonicCapacitor.isReachable()console.log('Reachability details are', reachabilityDetails.result)const info: {networkId: stringnetworkName: stringcountryCode: stringproducts?: { productId: string; productType: string }[]error?: {type: stringtitle: stringstatus: numberdetail: string}} = JSON.parse(reachabilityDetails.result)} catch (e: any) {setLoading(false)console.log(JSON.stringify(e))present({cssClass: 'alert-style',header: 'Something went wrong.',message: `${e.message}`,buttons: ['Cancel', { text: 'Got It!' }],onDidDismiss: (e) => console.log('Alert Hook dismissed'),})}}
This code block starts by setting the variable body to a JSON encoded variable containing the phoneNumber received from the IonInput. The loading state is then set to true to give a visual indicator to the user.
The isReachable function is then called functionality exposed by the plugin. This function returns the networkId, networkName, countryCode, and products. The products array is an optional array supported by the MNO. There is also an error object which contains any potential errors.
The next step is to check if there are any errors and whether the UI needs updating to inform the user. For this, add the details constants to the slices of state at the top of the Home function:
const Home: React.FC = () => {...const [details, setDetails] = useState("")...}
Now inside your return(), above the line </IonContent>, add the following new lines to reflect these new states:
{details && <div>isReachable? : {details === 'true' ? '✔' : 'No'}</div>}
The application must handle a new error within the submitHandler. If the reachability API returns the HTTP status of 400, the Mobile Network Operator (MNO) is not supported. The authentication request needs to stop, and an error displays to the user. In the submitHandler, above the line } catch (e: any) {, add the following:
if (info.error?.status === 400) {present({cssClass: 'alert-style',header: 'Something went wrong.',message: 'Mobile Operator not supported.',buttons: ['Cancel', { text: 'Got It!' }],onDidDismiss: (e) => console.log('Alert Hook dismissed'),})setDetails('MNO not supported')setLoading(false)return}
The next step is to loop through the array of products and see if the PhoneCheck API is supported. If it isn't supported, stop trying to create the PhoneCheck. Continue updating the submitHandler by adding the following code:
let isPhoneCheckSupported = falseif (info.error?.status !== 412) {isPhoneCheckSupported = falsefor (const { productType } of info.products!) {console.log('supported products are', productType)if (productType === 'PhoneCheck') {isPhoneCheckSupported = true}}} else {isPhoneCheckSupported = true}if (!isPhoneCheckSupported) {present({cssClass: 'alert-style',header: 'Something went wrong.',message: 'PhoneCheck is not supported on MNO.',buttons: ['Cancel', { text: 'Got It!' }],onDidDismiss: (e) => console.log('Alert Hook dismissed'),})setDetails('PhoneCheck is not supported on MNO')setLoading(false)return}setDetails(JSON.stringify(isPhoneCheckSupported))
Here, the application creates the variable isPhoneCheckSupported. If the error status is not a 412, the application loops through the products and checks whether the productType equals PhoneCheck; if it does, then isPhoneCheckSupported is set to true.
If the isPhoneCheckSupported variable gets set to false by the end of the loop. Then this value means the MNO does not support PhoneCheck, and an alert will be rendered to explain as much.
Creating the PhoneCheck
At this point, the app can detect whether the PhoneCheck is supported or not using the isReachable function. It's time to create the PhoneCheck.
Below the line setDetails(JSON.stringify(isPhoneCheckSupported)), update the submitHandler with the following:
const response = await fetch(`${BASE_URL}/phone-check`, {headers: {'Content-Type': 'application/json',},method: 'POST',body,})const resp: { check_id: string; check_url: string } = await response.json()console.log('Server response is: ', JSON.stringify(resp))const check_url = resp.check_urlconst check_id = resp.check_idconsole.log('check url is', check_url)console.log('check_id is', check_id)
The example above makes a POST request to the endpoint /phone-check. When the request receives a response, an object is created with these two keys, check_url and check_id.
The next step is to open the Check URL using the check function. The UI also needs updating with the result from opening the check URL to let the user know it occurred. For this, define checked at the top of the Home function. This gets defined along with the phoneNumber, loading, and details as shown below:
const Home: React.FC = () => {...const [checked, setChecked] = useState("")...}
Update the return to reflect this new piece of state:
In the return(), above the line </IonContent> add the following:
{checked && <div>Check URL opened ✔</div>}
Time to open the Check URL using the check function. In the submitHandler, above the line } catch (e: any) {, add the following:
const isChecked = await TruPluginIonicCapacitor.check({ url: check_url })console.log(isChecked)console.log('isChecked (check) Result', isChecked.result)setChecked(JSON.stringify(isChecked))
Get the check result
The last step is to get the check result. If the result is a match, then update the UI to inform the user that a match occurred. For this, add the match constant at the top of the Home function along with phoneNumber, loading, details, and checked:
const [match, setMatch] = useState('')
The return function now needs the ability to output whether the match was a success or not. Above </IonContent>, add the following:
{match && <div>We have a match? {match === 'true' ? '✔' : 'No'}</div>}
All that is left is to make a GET request to the endpoint /api/register on our server. The request needs checkId as the check_id query parameter from the previous API response. Then, if match is true, the UI is updated to reflect this.
To do this, update submitHandler to include the following, above the line } catch (e: any) {:
const phoneCheckResponse = await fetch(`${BASE_URL}/phone-check?check_id=${check_id}`,{headers: {'Content-Type': 'application/json',},},)const phoneCheckResult: { match: boolean } = await phoneCheckResponse.json()console.log('PhoneCheck match', phoneCheckResult.match)setMatch(JSON.stringify(phoneCheckResult.match))setLoading(false)if (phoneCheckResult.match) {present({cssClass: 'alert-style',header: 'Success!',message: 'PhoneCheck Verification successful.',buttons: ['Cancel', { text: 'Got It!' }],onDidDismiss: (e) => console.log('Alert Hook dismissed'),})} else if (!phoneCheckResult.match) {present({cssClass: 'alert-style',header: 'Something went wrong.',message: 'PhoneCheck verification unsuccessful.',buttons: ['Cancel', { text: 'Got It!' }],onDidDismiss: (e) => console.log('Alert Hook dismissed'),})}
Building the project for native
Now that we've built our application, we have to build it for Android and iOS platforms. To do this, we'll leverage Capacitor, which ships with Ionic 5. Run the following in the terminal:
ionic build$ ionic cap add android$ ionic cap add ios
Here we create an optimized production build, then add native Android and iOS code. We should now have android and ios folders in the root.
Building the project for native - Android
Some further setup is required in order to use the tru.ID Ionic / Capacitor plugin on Android. In the terminal, run the following:
ionic cap sync$ ionic cap open android
This command will create an optimized production build, sync native code, and open the Android project in Android Studio.
For this project, we'll use Kotlin. To convert to Kotlin, right-click app/src/main/java/io/ionic/starter/MainActivity and press "Convert Java File to Kotlin File", ensuring that you convert project-wide (the entire module, not only the file).
This action will convert any existing Java files to Kotlin, and update your Gradle files to use Kotlin.
Next, update the following in android/build.gradle to:
allprojects {repositories {google()jcenter()maven {url "https://gitlab.com/api/v4/projects/22035475/packages/maven"}}}
Update the following in android/app/build.gradle to:
defaultConfig {configurations.all {resolutionStrategy { force 'androidx.core:core-ktx:1.6.0' }}}
dependencies {implementation "com.squareup.okhttp3:okhttp:4.9.0"implementation "org.jetbrains.kotlinx:kotlinx-serialization-json:1.2.2"implementation 'commons-io:commons-io:2.4'}
In your MainActivity, add the imports:
import com.trupluginioniccapacitor.TruPluginIonicCapacitorPluginimport android.os.Bundle
Lastly, we need to register the plugin. Add the plugin to your app's MainActivity onCreate method:
public override fun onCreate(savedInstanceState: Bundle?) {super.onCreate(savedInstanceState)registerPlugin(TruPluginIonicCapacitorPlugin::class.java)}
Building the project for native – iOS
Some further setup is required to use the tru.ID Ionic / Capacitor plugin on iOS. In the terminal, run the following:
ionic cap sync$ ionic cap open ios
This command will create an optimized production build, sync native code, and open the iOS project in XCode.
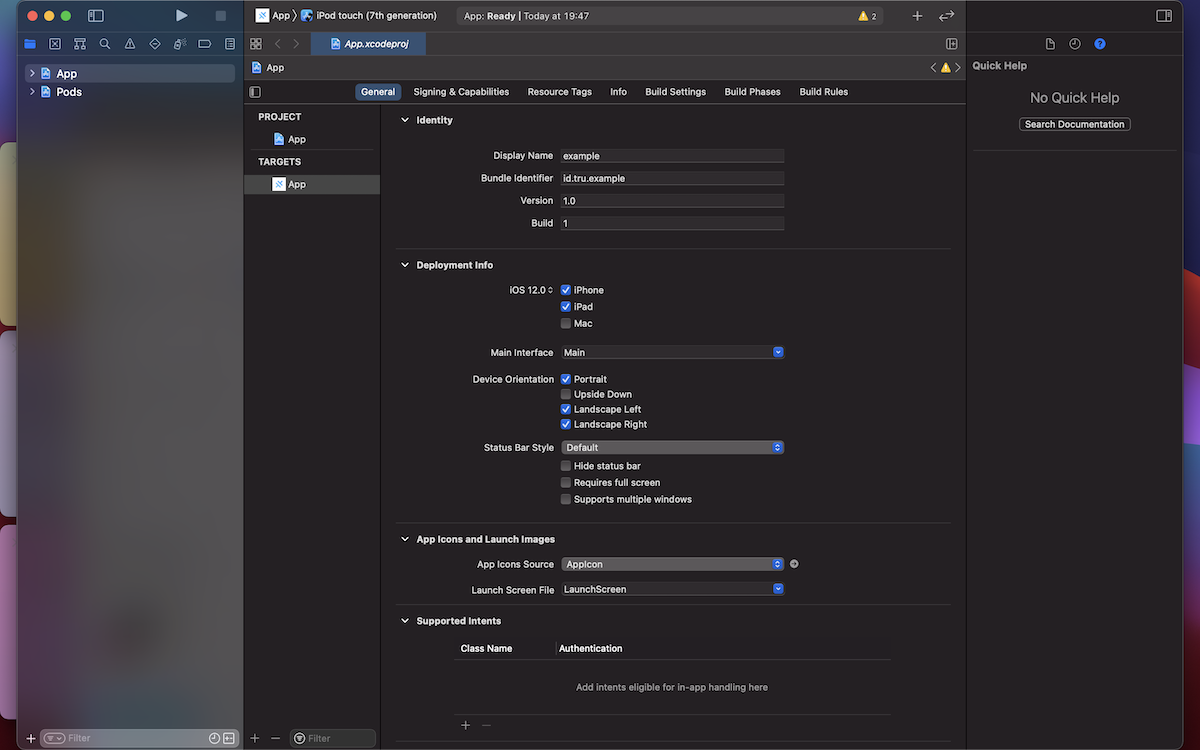
In XCode, click on App and set the bundle identifier to id.tru.example, as shown below:
Running the app
To run the Android app, press the play button in Android Studio with your physical Android device connected. Alternatively, from the terminal, run:
ionic capacitor run android --livereload --external
To run the iOS app, press the play button in XCode with your physical device connected. Alternatively, in the terminal, run:
ionic capacitor run ios --livereload --external
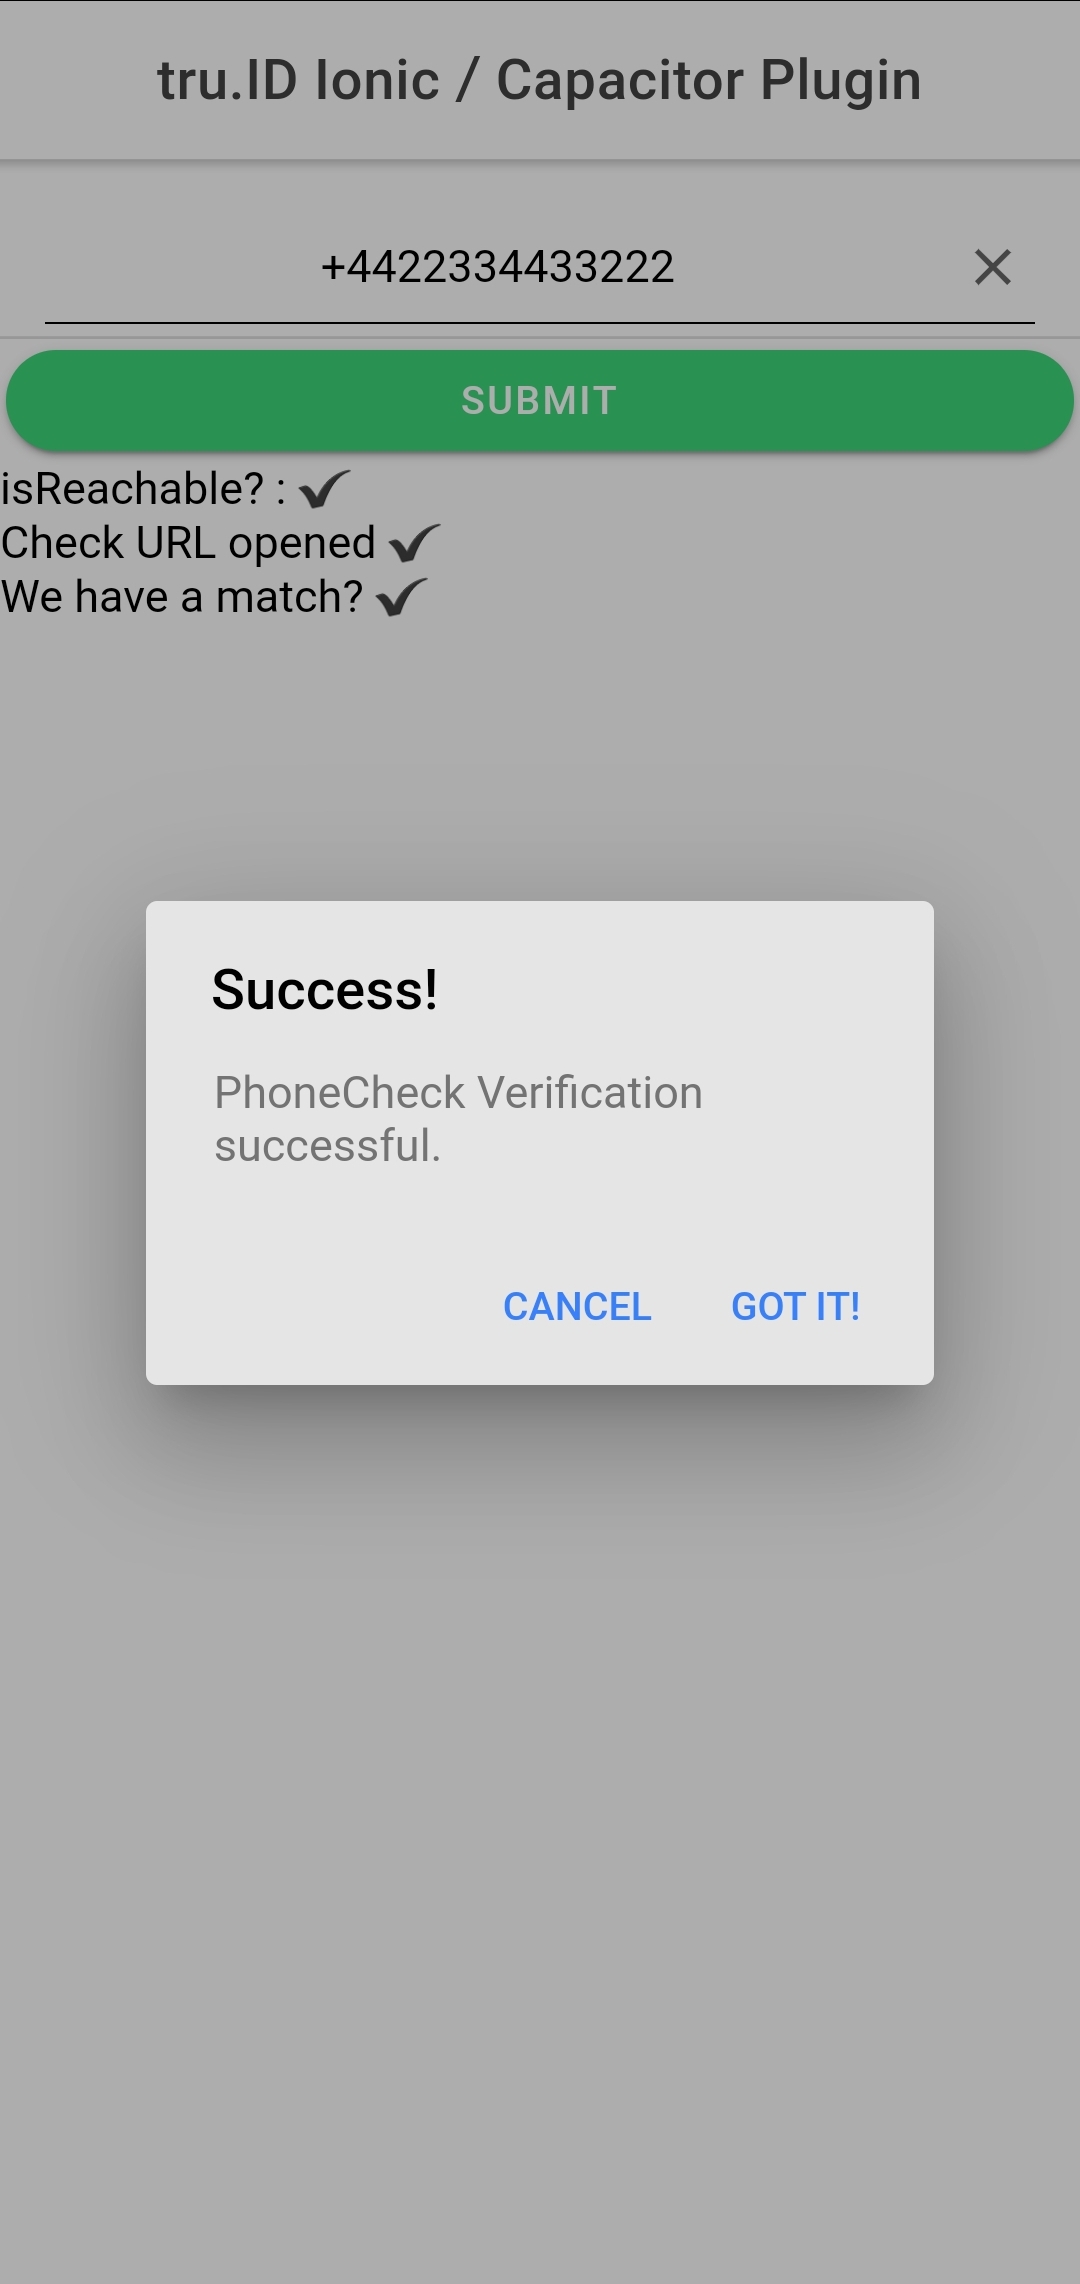
The complete workflow for a successful PhoneCheck creation looks like this:
If you've made it this far, you've now successfully created an Ionic application with passwordless authentication built-in using our PhoneCheck service.

