

Many applications use Firebase Phone Auth to add SMS two-factor authentication (2FA) phone verification. By layering on tru.ID SIMCheck, you can provide applications and users with an extra layer of protection against SIM swap fraud. In general, SIMCheck can be used to augment existing 2FA or enhance anti-fraud workflows.
If you wish to skip the tutorial but want to see the finished code sample, you can find it on GitHub.
Before you begin
You'll need the following to complete this tutorial:
- A mobile phone with a SIM card and mobile data connection
- a tru.ID Account
- NPM installed locally
Get Started
In your terminal, clone the starter-files branch with the following command:
git clone -b starter-files https://github.com/tru-ID/firebase-phone-auth-sim-swap-detection-android.git
If the finished code is what you're interested in, then the command below will clone the repository with the main branch as the active branch:
git clone -b main https://github.com/tru-ID/firebase-phone-auth-sim-swap-detection-android.git
npm install -g @tru_id/cli
tru login <YOUR_IDENTITY_PROVIDER> (this is one of google, github, or microsoft) using the Identity Provider you used when signing up. This command will open a new browser window and ask you to confirm your login. A successful login will show something similar to the below:Success. Tokens were written to /Users/user/.config/@tru_id/cli/config.json. You can now close the browser
config.json file contains some information you won't need to modify. This config file includes your Workspace Data Residency (EU, IN, US), your Workspace ID, and token information such as your scope.Create a new tru.ID project within the root directory with the following command:tru projects:create firebase-android --project-dir .
firebase-android directory and run the following command to clone the dev-server:git clone git@github.com:tru-ID/dev-server.git
dev-server directory, run the following command to create a.env copy of .env.example:cp .env.example .env
.env file, update the values of TRU_ID_CLIENT_ID andTRU_ID_CLIENT_SECRET with your client_id and client_secret in yourtru.json file.dev-server to the Internet for your mobile application to access your backend server. For this tutorial, we're using ngrok, which we've included in the dev-server functionality. So to start with, uncomment the following and populate them with your ngrok credentials:NGROK_ENABLED=true#NGROK_SUBDOMAIN=a-subdomain # Uncommenting this is optional. It is only available if you have a paid ngrok account.NGROK_AUTHTOKEN=<YOUR_NGROK_AUTHTOKEN> # This is found in the ngrok dashboard: https://dashboard.ngrok.com/get-started/your-authtokenNGROK_REGION=eu # This is where your ngrok URL will be hosted. If you're using tru.ID's `eu` data residency; leave it as is. Otherwise, you could specify `in` or `us`.
dev-server directory, run the following two commands:npm install # Installs all third-party dependencies in package.jsonnpm run dev # Starts the server
Set up Firebase Phone Auth for Android
This project uses Firebase Phone Auth for Android. The official documentation for this service will give a more in-depth description of how to get set up. However, below I've added a checklist of the steps you'll need to complete to progress:
- Create a Firebase account.
- Create a new Firebase project.
- In the menu on the left is an item labelled
Authentication. Click this and select theSign-in methodtab. EnablePhoneas a sign-in method. - Next, in the Project settings, create an Application by clicking
Add app. Choose the Android button. Then enter the Android application name (in this instance, it iscom.example.firebaseandroid). Follow the instructions, but don't download thegoogle-services.jsonfile for the moment. - In your Project settings, select the
App Checktab and enableSafety Net. This project will need an SHA-256 fingerprint retrieved by running the following command in the terminal:./gradlew signingReport. (Note: Be sure to get theSHA-256entry under theVariant: debugsection.) - Download
google-services.jsonand save it in theappdirectory besidebuild.gradle.
Finally, connect your phone to your computer so that you can run the Android application on your device.
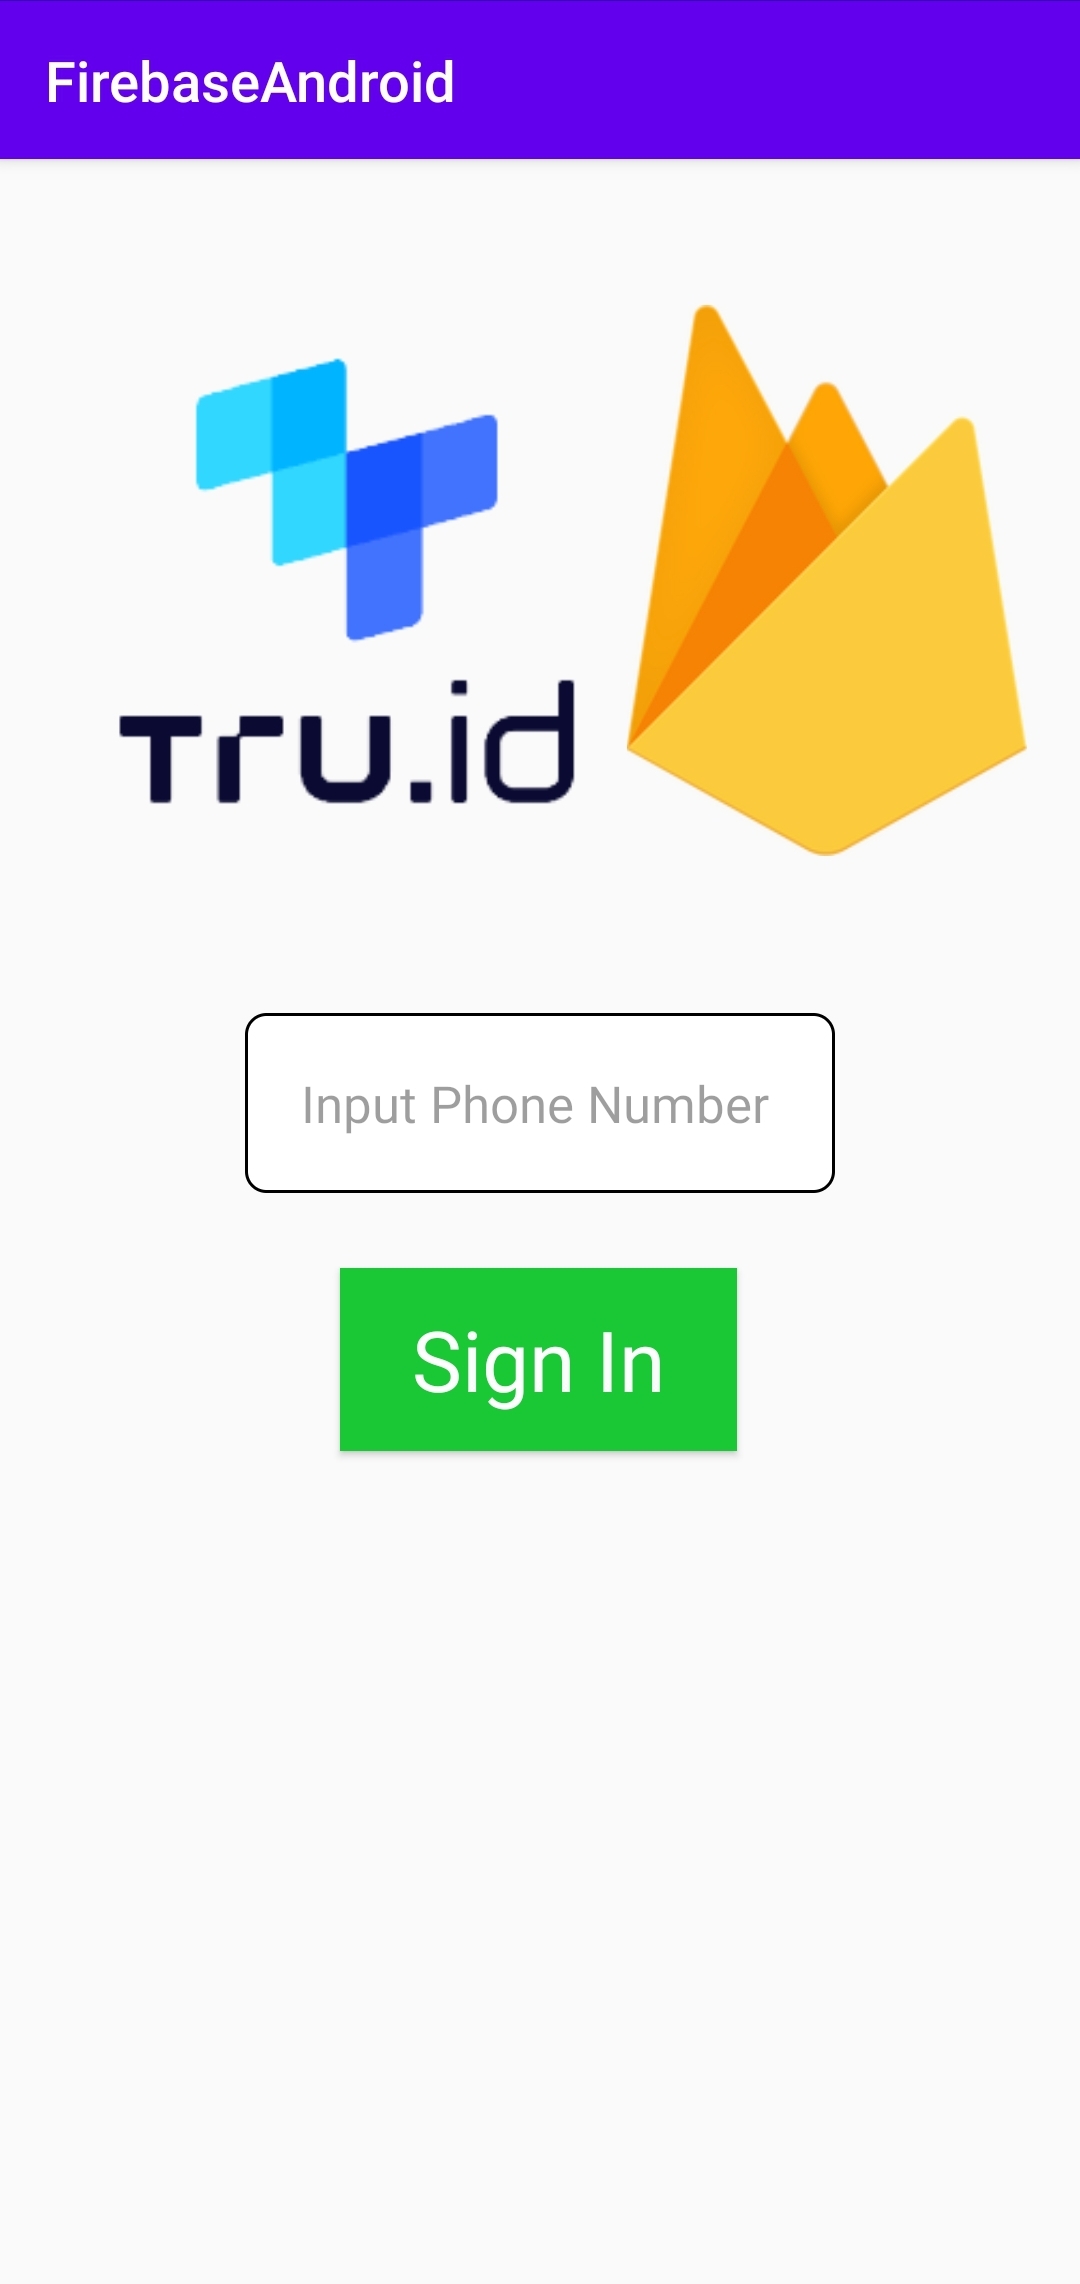
Your app should look like this:
If you cloned the repository from GitHub and checked out the starter-files branch at the beginning of this tutorial, you can run the application on your phone. You can also see it as a fully functional application with authentication using Firebase's Phone Auth. We're now going to add SIM Swap detection to this application.
Add SIM swap detection
Before the user authenticates with Firebase Phone Auth, we would like to perform SIM swap detection using the tru.ID SIMCheck API ensures the user is not a victim of SIM swap fraud. Only if the user is successfully authenticated with SIMCheck do we proceed with Firebase Phone Authentication.
The first step is to detect if the SIMCheck API supports the user's mobile carrier. To do this, we'll use the tru.ID Android SDK – specifically, the isReachable function. This function returns information like the network provider and an array of supported products.
Next, we'll create the SIMCheck resource by sending a POST request to base_url + /sim-check with the user's phone number to the development server.
When we make that request, we get back a no_sim_change property which is a boolean indicating whether the SIM card related to the phone number changed recently.
First, add the following imports to app/build.gradle:
dependencies {// HTTPSimplementation 'com.squareup.okhttp3:okhttp:4.9.1'implementation 'com.squareup.retrofit2:retrofit:2.9.0'implementation 'com.squareup.retrofit2:converter-gson:2.9.0'//Coroutinesimplementation 'org.jetbrains.kotlinx:kotlinx-coroutines-core:1.6.1'implementation 'org.jetbrains.kotlinx:kotlinx-coroutines-android:1.6.1'implementation 'id.tru.sdk:tru-sdk-android:1.0.0'}
Be sure to sync with Gradle after this.
Next, we need add the imports listed below to the top of src/main/java/com/example/firebaseandroid/MainActivity.kt:
import id.tru.sdk.TruSDKimport kotlinx.coroutines.CoroutineScopeimport kotlinx.coroutines.Dispatchersimport kotlinx.coroutines.launch
In this MainActivity.kt file, locate the onCreate() function, and add the following code to initialize the tru.ID SDK above the auth = FirebaseAuth.getInstance() line:
TruSDK.initializeSdk(this.applicationContext)
Next, within SubmitHandler.setOnClickListener and underneath setUIStatus(SubmitHandler, phoneInput, false), paste the following:
CoroutineScope(Dispatchers.IO).launch {val resp: JSONObject = TruSDK.getInstance().openWithDataCellular(URL("https://eu.api.tru.id/public/coverage/v0.1/device_ip"), false)if (resp.optString("error") != "") {println("not reachable: ${resp.optString("error_description","No error description found")}")} else {val status = resp.optInt("http_status")if (status == 200) {val body = resp.optJSONObject("response_body")if (body != null) {val products = body.optJSONArray("products")if (products != null) {(0 until products.length()).forEach {val product = products.getJSONObject(it)if (product.get("product_id") == "SCK") {supportsSimCheck = true}}}}}if (!supportsSimCheck) {renderMessage("Something went wrong.", "Please contact support.")setUIStatus(SubmitHandler, phoneInput, true);return@launch}}}
Here, we call the Reachability API and create a mutable variable supportsSimCheck. If we have a list of products, we loop through the products and see if any supported product IDs match the ‘Sim Check’ product ID. If there is a match, it means we support the SIMCheck API; then, we set our supportsSimCheck variable to true. Else, we set it to false.
We then check if the variable is false – i.e., we do not support the SIMCheck API – and we render an error message and enable the UI.
Create the SIMCheck resource
The next step is to create the SIMCheck resource.
Create a folder (package) called API within src/main/java/com/example/firebaseandroid. Then within this new folder, create a new subfolder called data.
Now, within data, create a class called SIMCheck.kt and copy the following code sample into this file:
package com.example.firebaseandroid.API.dataimport com.google.gson.annotations.SerializedNamedata class SIMCheckPost(@SerializedName("phone_number") val phone_number: String)data class SIMCheckResult(@SerializedName("no_sim_change") val no_sim_change: Boolean)
The example above defined two new data model classes called:
SIMCheckPost, which maps to thePOSTbodySIMCheckResult, which maps to the response of thePOSTrequest to/sim-check
We use @SerializedName to ensure the values match the expected input and response.
Next, navigate to the API folder and create another folder (package) named retrofit. Within it, create an interface named RetrofitService and replace its contents with the following:
package com.example.firebaseandroid.API.retrofitimport com.example.firebaseandroid.API.data.SIMCheckPostimport com.example.firebaseandroid.API.data.SIMCheckResultimport retrofit2.Responseimport retrofit2.http.Bodyimport retrofit2.http.Headersimport retrofit2.http.POSTinterface RetrofitService {@Headers("Content-Type: application/json")@POST("/sim-check")suspend fun createSIMCheck(@Body user: SIMCheckPost): Response<SIMCheckResult>companion object {const val base_url = "https://{subdomain}.{region}.ngrok.io"}}
Here, we use the model we created to make the POST request. We also create a companion object, which allows us to access base_url as an object (i.e., RetrofitService.base_url).
Remember to replace the placeholder URL value in base_url with the ngrok URL for your running development server.
Request the SIMCheck resource
All that's left is to make the POST request to the SIMCheck endpoint.
First, ensure to add the relevant imports to MainActivity.kt:
import com.example.firebaseandroid.API.retrofit.RetrofitServiceimport retrofit2.Retrofitimport retrofit2.converter.gson.GsonConverterFactoryimport com.example.firebaseandroid.API.data.SIMCheckPostimport com.example.firebaseandroid.API.data.SIMCheckResult
Next, create a function to handle data fetching with retrofit at the bottom of MainActivity.kt:
//retrofit setupprivate fun rf(): RetrofitService {return Retrofit.Builder().baseUrl(RetrofitService.base_url).addConverterFactory(GsonConverterFactory.create()).build().create(RetrofitService::class.java)}
Next, within SubmitHandler.setOnClickListener and underneath the if (!supportsSimCheck) block, paste the following:
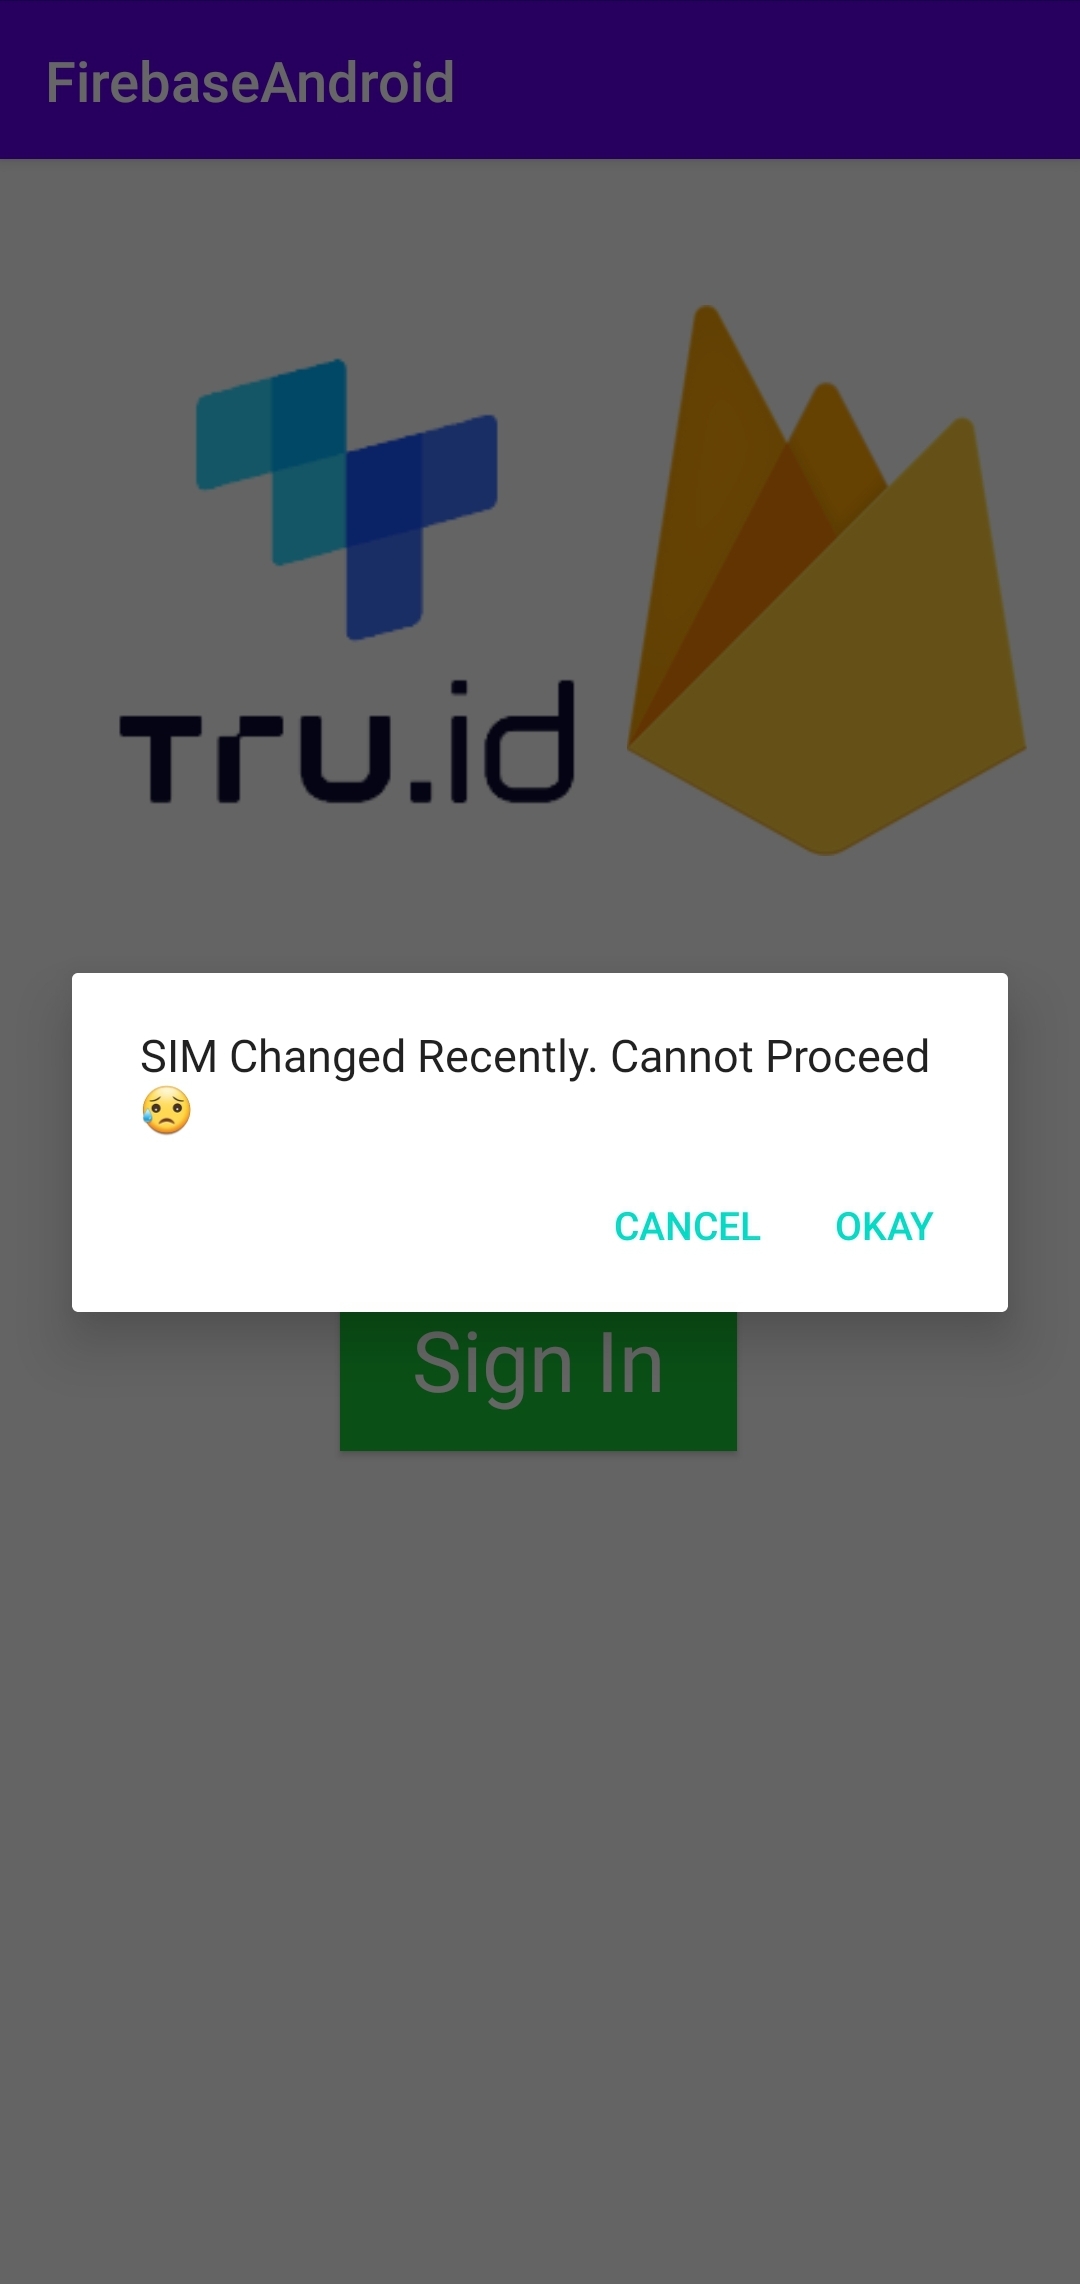
val response = rf().createSIMCheck(SIMCheckPost(phoneNumber))if (response.isSuccessful && response.body() != null) {val simCheckResult = response.body() as SIMCheckResult// update the UI if the SIM has changed recentlyif (!simCheckResult.no_sim_change) {renderMessage("SIM Changed Recently. Cannot Proceed 😥", "SIM-Changed")setUIStatus(SubmitHandler, phoneInput, true);return@launch}}
Here, we call our data fetching function and get the response. If the SIM has changed, we render a message informing the user.
If the SIM has changed, the UI will look like this:
The last step is to ensure we make the SIMCheck before Firebase Phone Authentication. For that, first, remove the following from the bottom of the else block:
// proceed with Firebase Phone Authval options = PhoneAuthOptions.newBuilder(auth!!).setPhoneNumber(phoneNumber) // Phone number to verify.setTimeout(60L, TimeUnit.SECONDS) // Timeout and unit.setActivity(this) // Activity (for callback binding).setCallbacks(callbacks) // OnVerificationStateChangedCallbacks.build()PhoneAuthProvider.verifyPhoneNumber(options)
We only want to proceed with the Firebase Phone Auth if we have a successful SIMCheck response. So we'll move the block we removed and place it below the if (!simCheckResult.no_sim_change) block.
Update CoroutineScope(Dispatchers.IO).launch to the same as the example below:
CoroutineScope(Dispatchers.IO).launch {...val response = rf().createSIMCheck(SIMCheckPost(phoneNumber))if (response.isSuccessful && response.body() != null) {val simCheckResult = response.body() as SIMCheckResult// update the UI if the SIM has changed recentlyif (!simCheckResult.no_sim_change) {renderMessage("SIM Changed Recently. Cannot Proceed 😥", "SIM-Changed")setUIStatus(SubmitHandler, phoneInput, true)return@launch}// proceed with Firebase Phone Authval options = PhoneAuthOptions.newBuilder(auth!!).setPhoneNumber(phoneNumber) // Phone number to verify.setTimeout(60L, TimeUnit.SECONDS) // Timeout and unit.setActivity(this@MainActivity) // Activity (for callback binding).setCallbacks(callbacks) // OnVerificationStateChangedCallbacks.build()PhoneAuthProvider.verifyPhoneNumber(options)}}
Here, we proceed with Firebase Phone Authentication only if we have a response and if the SIM has not changed.
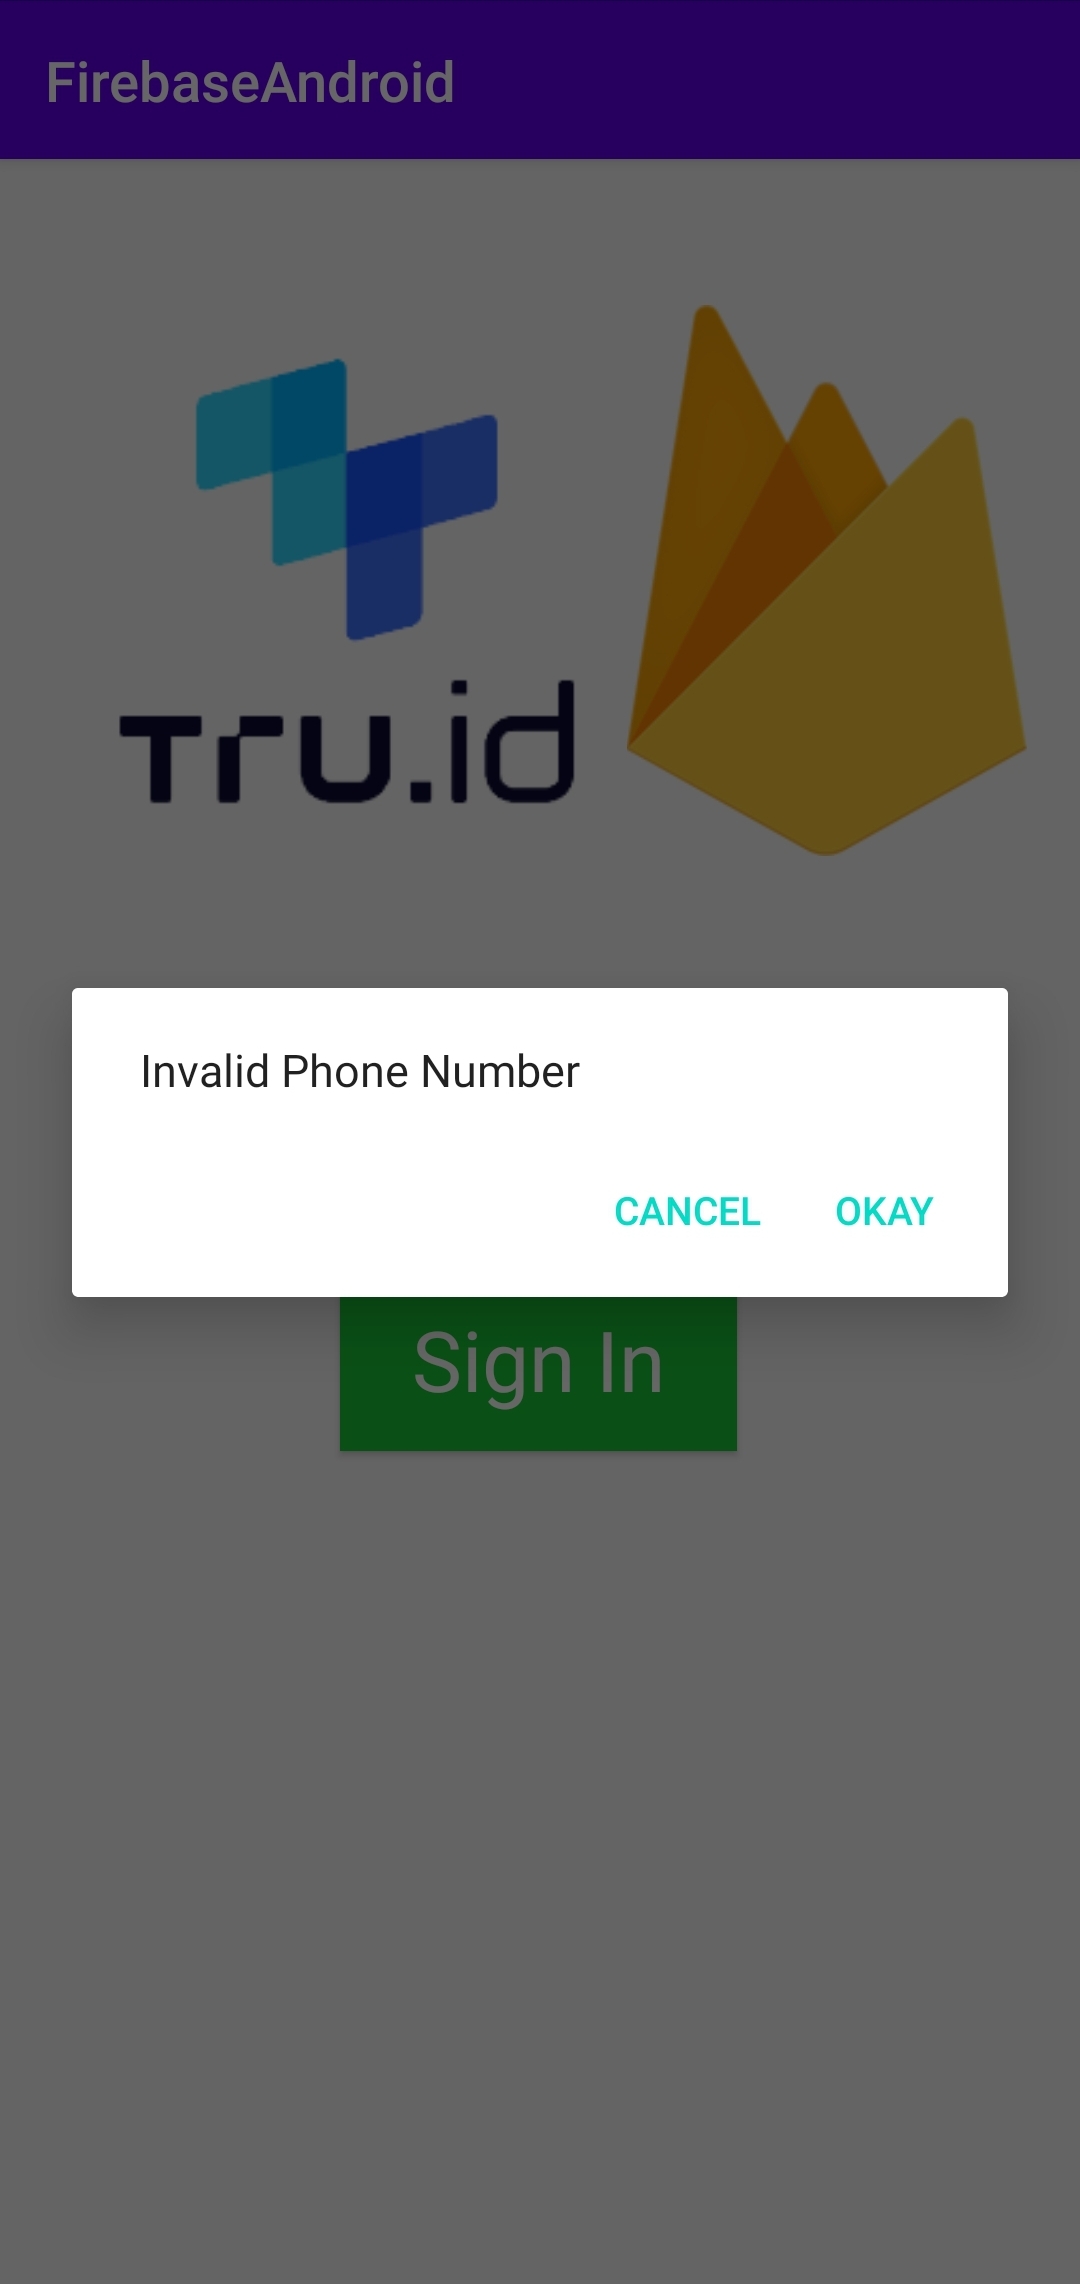
The image below shows an example of there being no SIM swap fraud, but the authentication with Firebase Phone Auth has failed:
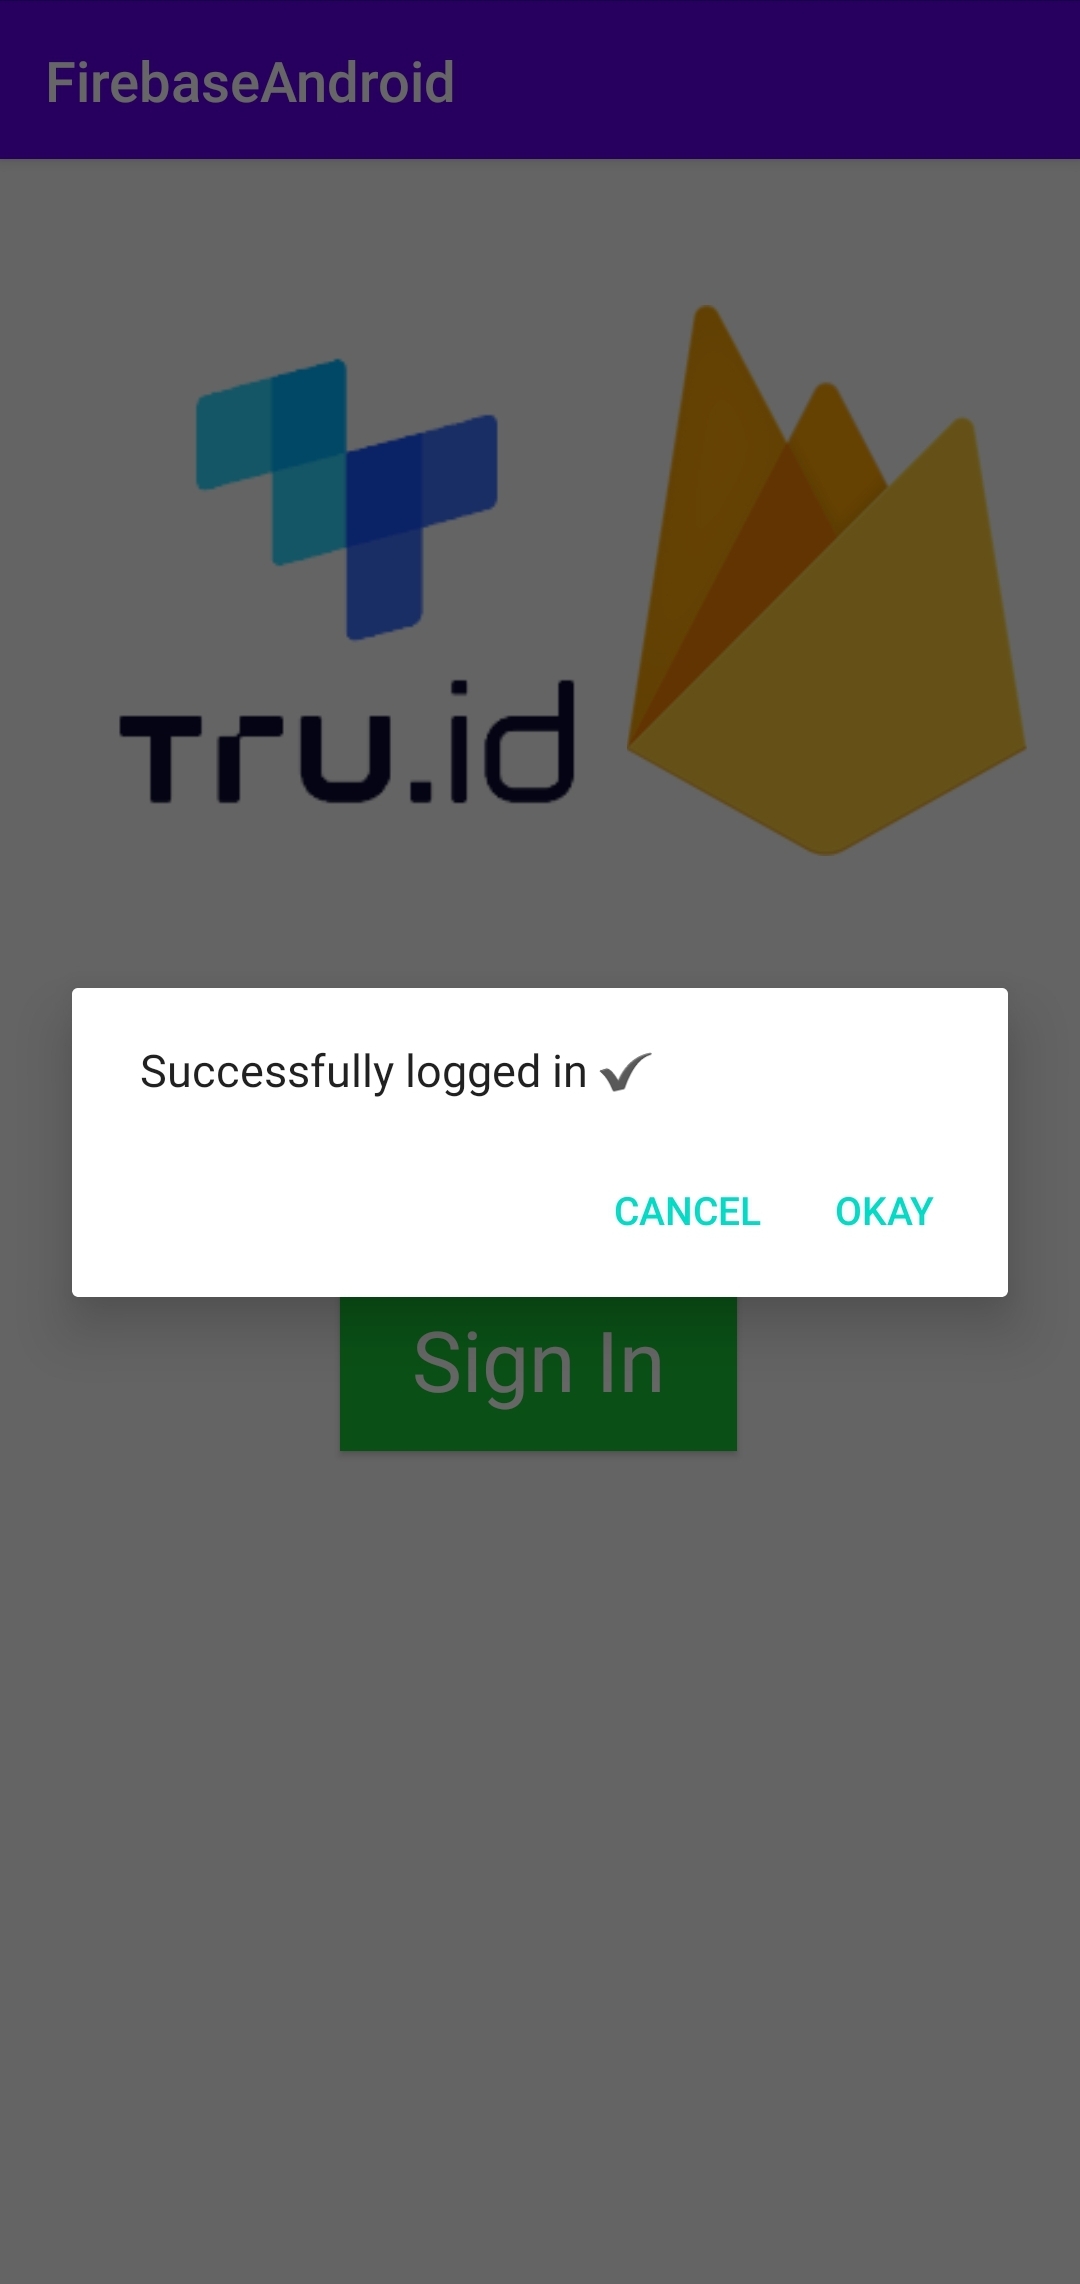
The image below shows an example of there being no SIM swap fraud, and the authentication with Firebase Phone Auth has passed:
That's it!
Wrapping up
If you've made it this far in the tutorial, we've managed to:
- Set up an existing Android application that authenticates with Firebase Phone Auth
- Create a tru.ID account and configure this through the tru.ID CLI
- Modify the existing Android application first to detect any signs of SIM swap fraud
- If there is no sign of SIM swap fraud, then proceed to authenticate with Firebase Phone Auth

